These are my study notes for the RHCSA exam on YUM modules. There’s most likely more information than what’s needed for the exam, and I cannot guarantee that all information is correct.
Definition
RHEL 8 content is distributed through two main repositories: BaseOS and AppStream.
BaseOS
Content in the BaseOS repository is intended to provide the core set of the underlying OS functionality that provides the foundation for all installations. This content is available in the RPM format and is subject to support terms similar to those in previous releases of Red Hat Enterprise Linux.
AppStream
Content in the AppStream repository includes additional user-space applications, runtime languages, and databases in support of the varied workloads and use cases. Content in AppStream is available in one of two formats - the familiar RPM format and an extension to the RPM format called modules.
Components made available as Application Streams can be packaged as modules or RPM packages and are delivered through the AppStream repository in Red Hat Enterprise Linux 8. Each AppStream component has a given life cycle.
Modules
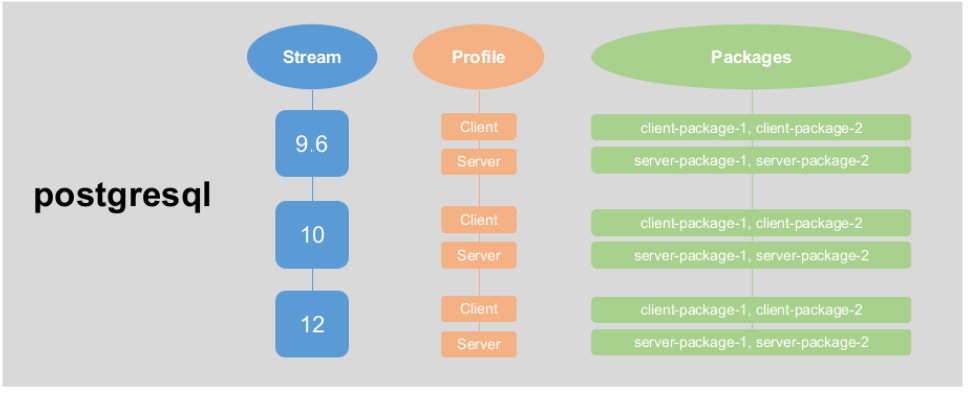
Modules allow you to install a specific version and/or type of an application in your system. For example, for ‘postgresql’ you can choose to install from multiple versions (stream), and client or server type (profile).
# yum module list postgresql

Last metadata expiration check: 0:20:44 ago on Sat 14 Mar 2020 08:59:58 PM UTC.
CentOS-8 - AppStream
Name                     Stream              Profiles                        Summary
postgresql               9.6           client, server [d]              PostgreSQL server and client module
postgresql               10 [d]        client, server [d]              PostgreSQL server and client module
postgresql               12            client, server                  PostgreSQL server and client module

Hint: [d]efault, [e]nabled, [x]disabled, [i]nstalled
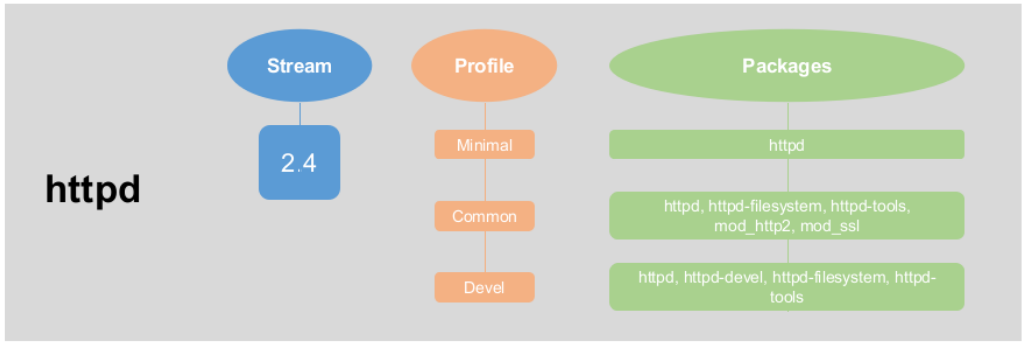
For httpd on Centos8, currently only one stream (version) is available, and profiles are the package type (common, minimal, development)
# yum module list httpd

Last metadata expiration check: 0:21:46 ago on Sat 14 Mar 2020 08:59:58 PM UTC.
CentOS-8 - AppStream
Name                  Stream               Profiles                              Summary
httpd                 2.4 [d][e]           common [d], devel, minimal            Apache HTTP Server

Hint: [d]efault, [e]nabled, [x]disabled, [i]nstalled
Working with Modules
Getting Information on Modules
Listing all modules
# yum module list
Listing module summary for one module with yum module list [module]
# yum module list httpd

Last metadata expiration check: 0:21:46 ago on Sat 14 Mar 2020 08:59:58 PM UTC.
CentOS-8 - AppStream
Name                  Stream               Profiles                              Summary
httpd                 2.4 [d][e]           common [d], devel, minimal            Apache HTTP Server
Listing info on a module with yum module info [module]
# yum module info httpd

Last metadata expiration check: 0:35:45 ago on Sat 14 Mar 2020 08:59:58 PM UTC.
Name             : httpd
Stream           : 2.4 [d][e][a]
Version          : 8010020191223202455
Context          : cdc1202b
Architecture     : x86_64
Profiles         : common [d], devel, minimal
Default profiles : common
Repo             : AppStream
Summary          : Apache HTTP Server
Description      : Apache httpd is a powerful, efficient, and extensible HTTP server.
Artifacts        : httpd-0:2.4.37-16.module_el8.1.0+256+ae790463.src
                 : httpd-0:2.4.37-16.module_el8.1.0+256+ae790463.x86_64
                 : httpd-debuginfo-0:2.4.37-16.module_el8.1.0+256+ae790463.x86_64
                 : httpd-debugsource-0:2.4.37-16.module_el8.1.0+256+ae790463.x86_64
                 : httpd-devel-0:2.4.37-16.module_el8.1.0+256+ae790463.x86_64
                 : httpd-filesystem-0:2.4.37-16.module_el8.1.0+256+ae790463.noarch
                 : httpd-manual-0:2.4.37-16.module_el8.1.0+256+ae790463.noarch
                 : httpd-tools-0:2.4.37-16.module_el8.1.0+256+ae790463.x86_64
                 : httpd-tools-debuginfo-0:2.4.37-16.module_el8.1.0+256+ae790463.x86_64
                 : mod_http2-0:1.11.3-3.module_el8.1.0+213+acce2796.src
                 : mod_http2-0:1.11.3-3.module_el8.1.0+213+acce2796.x86_64
                 : mod_http2-debuginfo-0:1.11.3-3.module_el8.1.0+213+acce2796.x86_64
                 : mod_http2-debugsource-0:1.11.3-3.module_el8.1.0+213+acce2796.x86_64
                 : mod_ldap-0:2.4.37-16.module_el8.1.0+256+ae790463.x86_64
                 : mod_ldap-debuginfo-0:2.4.37-16.module_el8.1.0+256+ae790463.x86_64
                 : mod_md-0:2.4.37-16.module_el8.1.0+256+ae790463.x86_64
                 : mod_md-debuginfo-0:2.4.37-16.module_el8.1.0+256+ae790463.x86_64
                 : mod_proxy_html-1:2.4.37-16.module_el8.1.0+256+ae790463.x86_64
                 : mod_proxy_html-debuginfo-1:2.4.37-16.module_el8.1.0+256+ae790463.x86_64
                 : mod_session-0:2.4.37-16.module_el8.1.0+256+ae790463.x86_64
                 : mod_session-debuginfo-0:2.4.37-16.module_el8.1.0+256+ae790463.x86_64
                 : mod_ssl-1:2.4.37-16.module_el8.1.0+256+ae790463.x86_64
                 : mod_ssl-debuginfo-1:2.4.37-16.module_el8.1.0+256+ae790463.x86_64
Listing profiles with yum module info --profile [module]
# yum module info --profile httpd

Last metadata expiration check: 0:36:28 ago on Sat 14 Mar 2020 08:59:58 PM UTC.
Name    : httpd:2.4:8010020191223202455:cdc1202b:x86_64
common  : httpd
        : httpd-filesystem
        : httpd-tools
        : mod_http2
        : mod_ssl
devel   : httpd
        : httpd-devel
        : httpd-filesystem
        : httpd-tools
minimal : httpd
You can also filter the information with [module_name]:[stream]
# yum module info --profile php:7.3
Enabling Stream
Note that switching module streams will not alter installed packages. You will need to remove a package, enable the stream and then install the package.
Enable the stream for ‘postgresql’ v9.6
# yum module enable postgresql:9.6
Enable the httpd devel profile
# yum module enable --profile httpd:2.4/devel

Last metadata expiration check: 0:47:51 ago on Sat 14 Mar 2020 08:59:58 PM UTC.
Ignoring unnecessary profile: 'httpd/devel'
Dependencies resolved.
Nothing to do.
Complete!
Then install the package
# yum install postgresql httpd
To change a module stream again, you will need to run yum module reset [module name], and then enable the new module.
# yum module enable postgresql:10

Last metadata expiration check: 0:06:07 ago on Sat 14 Mar 2020 09:57:50 PM UTC.
Dependencies resolved.
The operation would result in switching of module 'postgresql' stream '9.6' to stream '10'
Error: It is not possible to switch enabled streams of a module.
It is recommended to remove all installed content from the module, and reset the module using 'dnf module reset <module_name>' command. After you reset the module, you can install the other stream.
# yum module reset postgresql

Last metadata expiration check: 0:06:15 ago on Sat 14 Mar 2020 09:57:50 PM UTC.
Dependencies resolved.
=================================================================================================
Package               Architecture         Version                  Repository             Size
=================================================================================================
Resetting modules:
postgresql

Transaction Summary
=================================================================================================

Is this ok [y/N]: y
Complete!
These are my study notes for the RHCSA exam on disk compression. There’s most likely more information than what’s needed for the exam, and I cannot guarantee that all information is correct.
Definition
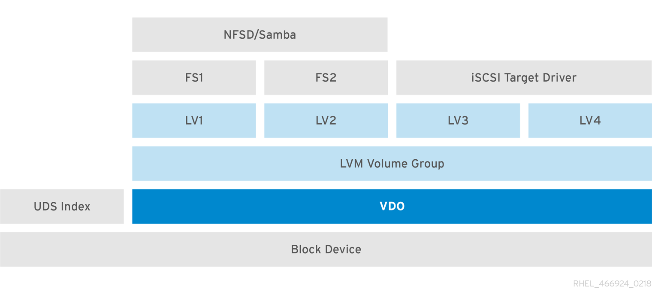
Virtual Data Optimizer (VDO) provides inline data reduction for Linux in the form of deduplication, compression, and thin provisioning. When you set up a VDO volume, you specify a block device on which to construct your VDO volume and the amount of logical storage you plan to present.
In the Red Hat Enterprise Linux 7.5 Beta, we introduced virtual data optimizer (VDO). VDO is a kernel module that can save disk space and reduce replication bandwidth. VDO sits on top of any block storage device and provides zero-block elimination, deduplication of redundant blocks, and data compression.
VDO can be applied to a block device, and then normal disk operations can be applied to that device. LVM for example, can sit on top of VDO.
Physical disk -> VDO -> Volumegroup -> Logical volume -> file system
Requirements and Recommendations
Memory
Each VDO volume has two distinct memory requirements:
The VDO module
VDO requires 370 MB of RAM plus an additional 268 MB per each 1 TB of physical storage managed by the volume.
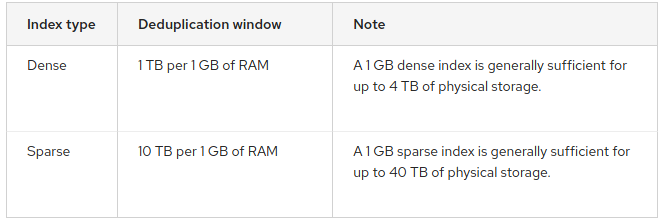
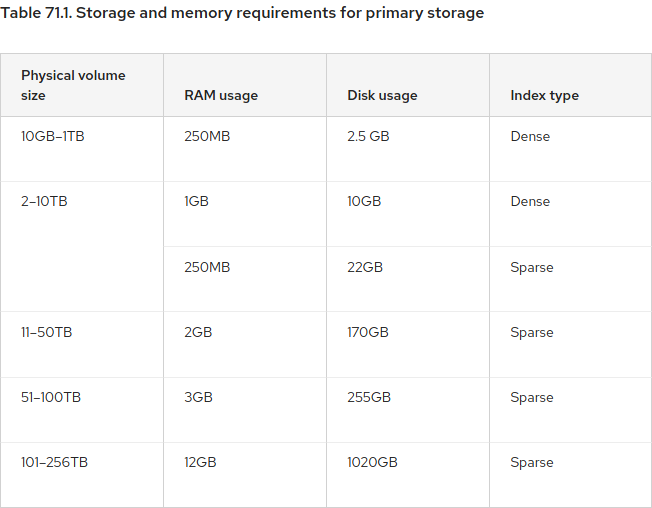
The Universal Deduplication Service (UDS) index
UDS requires a minimum of 250 MB of RAM, which is also the default amount that deduplication uses.
The memory required for the UDS index is determined by the index type and the required size of the deduplication window:
Note: Sparse is the recommended configuration.
Storage
Logical Size
Specifies the logical VDO volume size. The VDO Logical Size is how much storage we tell the OS that we have. Because of reduction and deduplication, this number will be bigger than the real physical size. This ratio will vary according to the type of data that is being stored (binary, video, audio, compressed data will have a very low ratio).
Red Hat’s Recommendation
For active VMs or container storage
Use logical size that is ten times the physical size of your block device. For example, if your block device is 1TB in size, use 10T here.
For object storage
Use logical size that is three times the physical size of your block device. For example, if your block device is 1TB in size, use 3T here.
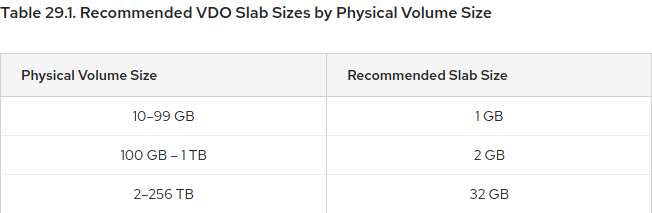
Slab Size
Specifies the size of the increment by which a VDO is grown. All of the slabs for a given volume will be of the same size, which may be any power of 2 multiple of 128 MB up to 32 GB. At least one entire slab is reserved by VDO for metadata, and therefore cannot be used for storing user data.
The default slab size is 2 GB in order to facilitate evaluating VDO on smaller test systems. A single VDO volume may have up to 8096 slabs. Therefore, in the default configuration with 2 GB slabs, the maximum allowed physical storage is 16 TB. When using 32 GB slabs, the maximum allowed physical storage is 256 TB.
The table above is from RHEL 7 documentation
Examples of VDO System Requirements by Physical Volume Size
The following tables provide approximate system requirements of VDO based on the size of the underlying physical volume. Each table lists requirements appropriate to the intended deployment, such as primary storage or backup storage.
Deduplication, Indexing and Compression
Deduplication and Index
VDO uses a high-performance de-duplication index called UDS to detect duplicate blocks of data as they are being stored. The UDS index provides the foundation of the VDO product. For each new piece of data, it quickly determines if that piece is identical to any previously stored piece of data. If the index finds match, the storage system can then internally reference the existing item to avoid storing the same information more than once.
Deduplication is enabled by default.
To disable deduplication during VDO block creation (so only compression is used), use the --deduplication=disabled option (you will not be able to use the sparseIndex option)
In addition to block-level deduplication, VDO also provides inline block-level compression using the HIOPS Compression™ technology.
VDO volume compression is on by default.
Compression operates on blocks that have not been identified as duplicates. When unique data is seen for the first time, it is compressed. Subsequent copies of data that have already been stored are deduplicated without requiring an additional compression step.
Configuration Steps
Install vdo (and if not installed by default kmod-vdo)
x-systemd.device-timeout=
          Configure how long systemd should wait for a device to show up before
          giving up on an entry from /etc/fstab. Specify a time in seconds or
          explicitly append a unit such as "s", "min", "h", "ms".

x-systemd.requires=
          Configures a Requires= and an After= dependency between the created mount
          unit and another systemd unit, such as a device or mount unit.
Administration
Check for real physical space usage
# vdostats --human-readable

Device              Size   Used   Available   Use%   Space Saving%
/dev/mapper/my_vdo  1.8T  407.9G    1.4T       22%       21%
The updated RHCSA exam for RHEL 8 has been out since last year, however, the old exam is still available, and will stay available until August 1st, 2020:
You may be trying to figure out what version will be best for you, and I’m hoping the information here will help you.
Something to take in consideration is that the exam is valid for 3 years, or 2 releases (meaning that once RHEL 9 is out, your RHSCA on RHEL 7 is no longer valid). And seeing on how RHEL 6 to 7 took 4 years, and RHEL 7 to 8 took 5 years, with RHCSA v7 you will most likely run out of the 3 years before RHEL 9 is released.
Objective Differences - RHCSA v7 vs v8
=> RHCSA v7 - Content No Longer Needed for V8
Operate running systems
Access a virtual machine’s console.
Start and stop virtual machines.
Create and configure file systems
Mount and unmount CIFS and NFS network file systems.
CIFS is no longer covered
Create and manage Access Control Lists (ACLs).
Looks like this is still in the exam, but under “Manage Security => Create and use file access control lists”
Deploy, configure, and maintain systems
Install Red Hat Enterprise Linux systems as virtual guests.
Configure systems to launch virtual machines at boot.
Configure a system to use time services.
Update the kernel package appropriately to ensure a bootable system.
Manage users and groups
Configure a system to use an existing authentication service for user and group information.
Manage security
Configure firewall settings using firewall-config, firewall-cmd, or iptables.
iptables is no longer covered
=> RHCSA v8 - New Content
Operate running systems
Preserve system journals
Create and configure file systems
Configure disk compression
Manage layered storage
Deploy, configure, and maintain systems
Configure time service clients
Red Hat doesn’t ask candidates to set up time service client and server anymore but only time service clients. Knowledge of the NTP daemon is no longer necessary, that of Chrony is enough.
Bash arrays can be great for iterating over a list of items. I’m giving a quick example below on a list of services. All you need is to list all values in different arrays and use an index to map them back together.
Now to iterate through our items, let’s make sure we start at index 1 and add at each run:
cnt=1

for i in ${!service_arr[@]} ; do
  echo "The configuration file for the service ${service_arr[$i]} is ${path_arr[$i]}/${config_file_arr[$i]}"
  let count+=1
done
The result is:
The configuration file for the service CUPS is /etc/cups/cupsd.conf
The configuration file for the service MPD is /etc/mpd.conf
The configuration file for the service SSHD is /etc/sshd.conf
The configuration file for the service DHCPD is /etc/dhcpd.conf
You can also use especial characters (like * when searching for files and using shell expansion). Just make sure to properly quote them.
The XPS 13 is a great laptop and it comes with an equally matched touchpad. Setting up touch gestures is pretty easy, and we will cover what needs to be done to get it working on Arch.
First, let’s install all the needed software:
extra/libinput
aur/libinput-gestures
After installing the 2 packages you should be able to run libinput-gestures -d as root and try the pre-defined gestures. You should see an output when you swipe left/right/up/down with ¾ fingers and pinch in/out.
# libinput-gestures -d

libinput-gestures: session unknown+unknown on Linux-5.0.6-arch1-1-ARCH-x86_64-with-arch, python 3.7.3, libinput 1.13.0
/usr/bin/libinput-gestures: hash 4cc3250c5befc6926c04b3e499114677
Gestures configured in /etc/libinput-gestures.conf:
swipe up           _internal ws_up
swipe down         _internal ws_down
swipe left         xdotool key alt+Right
swipe right        xdotool key alt+Left
pinch in           xdotool key super+s
pinch out          xdotool key super+s
libinput-gestures: device /dev/input/event10: DLL075B:01 06CB:76AF Touchpad
libinput-gestures: SWIPE up 3 [-33.88000000000001, -604.8000000000001]
   _internal ws_up
libinput-gestures: SWIPE right 3 [755.69, -17.479999999999993]
   xdotool key alt+Left
Let’s add your user to the input group (because it should not run as root), then re-login:
sudo gpasswd -a [user] input
Now let’s edit our personal config file in ~/.config/libinput-gestures.conf. Using xdotool create a map of what keyboard shortcuts you would like to map your gestures to. Keep in mind you can also map it to commands.
For example, my config file looks like this:
# Gestures
gesture swipe up 3 xdotool key Ctrl+F9
gesture swipe up 4 xdotool key Ctrl+F10
gesture swipe left 3 xdotool key Ctrl+Alt+Right
gesture swipe right 3 xdotool key Ctrl+Alt+Left
gesture swipe down 3 xdotool key Super+Down
And the keyboard shortcuts are mapped to (KDE):
Ctrl+F9 - Show all windows (current desktop)
Ctrl+F10 - Show all windows (all desktops)
Ctrl+Alt+Right - Move to desktop on right
Ctrl+Alt+Left - Move to desktop on left
Super+Down - Desktop preview
Let’s configure the gestures to start with the desktop environment:
$ libinput-gestures-setup autostart
And start the gestures for the current session:
$ libinput-gestures-setup start

Icon theme "papirus" not found.
Icon theme "ubuntu-mono-dark" not found.
Icon theme "Mint-X" not found.
Icon theme "elementary" not found.
Icon theme "gnome" not found.
libinput-gestures started.