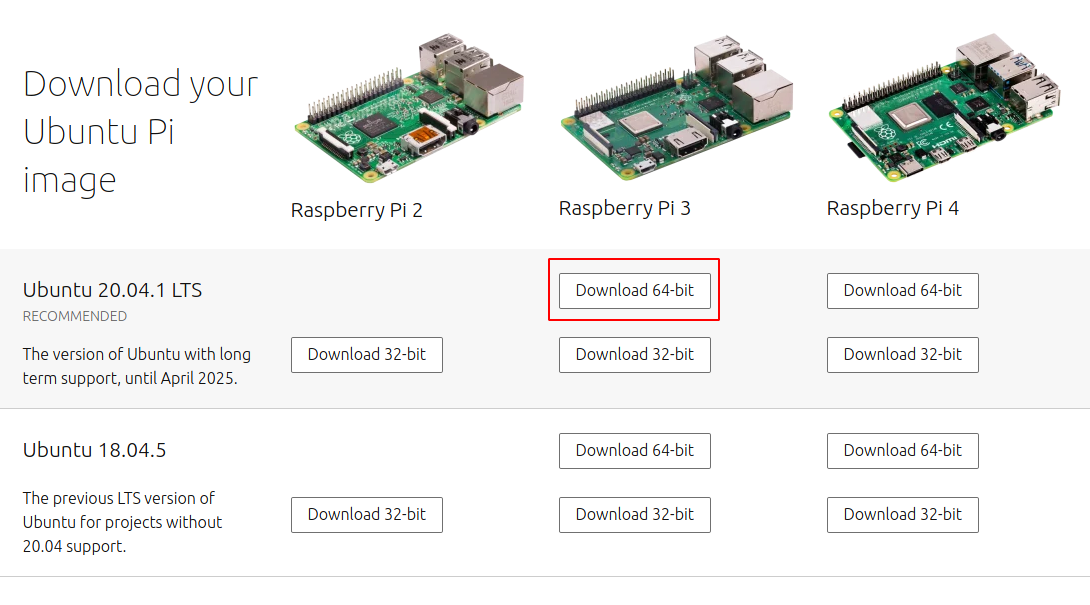
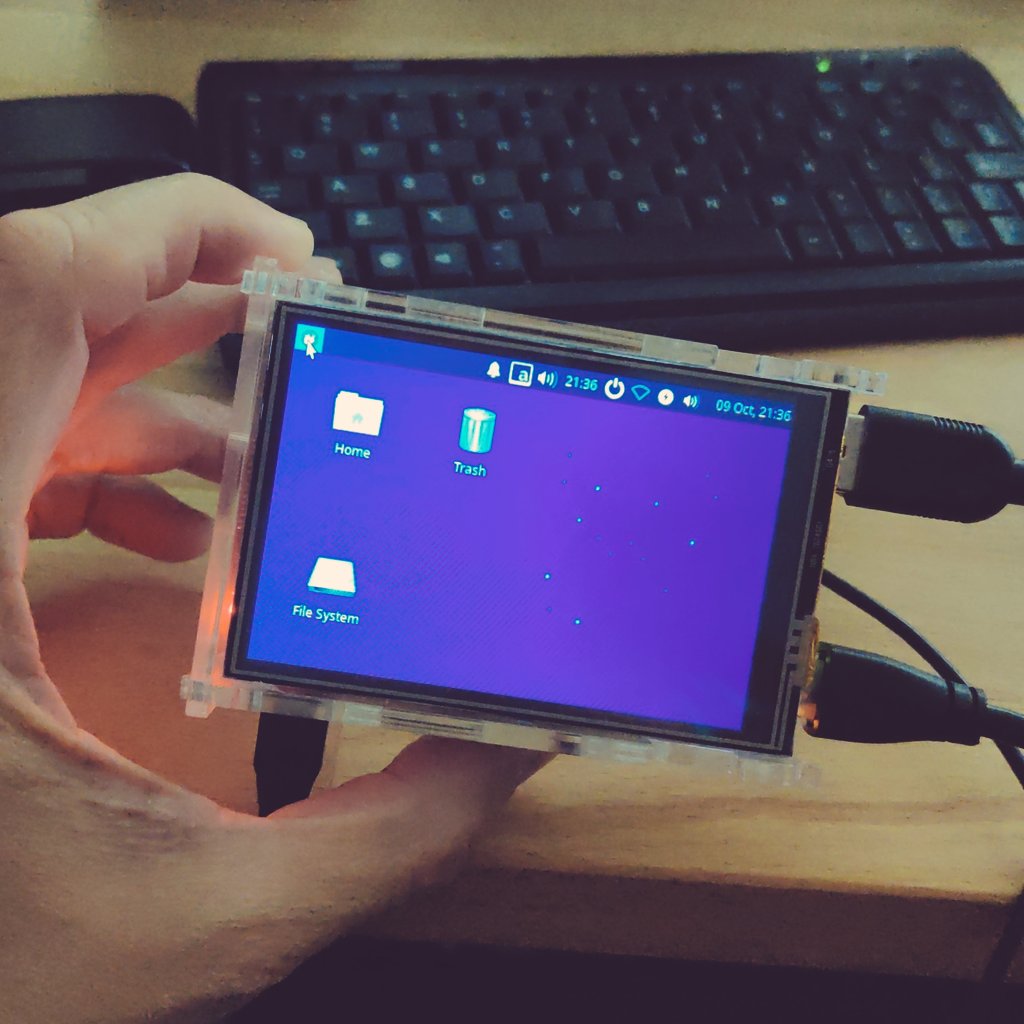
Following the steps of an older post (Installing Kuman 3), I find myself trying to configure the same Waveshare 3.5” LCD touch screen on my Raspberry Pi 3B, but now with Ubuntu 20.04 64.bit.
As usual the LCDs from Waveshare are not that easy to configure. While researching online I could not find any working instructions on how to configure the screen with Ubuntu 20.04. I found a few Git repos (Wavesahre and LCD Wiki), but they all failed to get me with a working config.
After spending a lot of time I was able to get it to work using some of the files and instructions from Waveshare’s official Git Repo (as well as LCD Wiki).
If you want to save yourself sometime, just use my Ansible repo to get your RPI3B configured. Otherwise, the manual instructions are bellow.
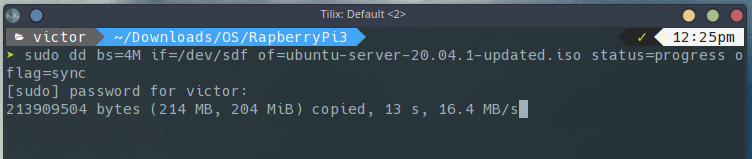
If you have reached this page I expect that you already know what dd is. But you if you don’t, dd is a command-line utility that is used to convert and copy files. It’s commonly found on various (Linux) distro help pages that show new users how to setup USB (or Micro SD) drives to install or run (like Raspberry Pi) the OS.
One of the main problems is that when running the dd utility, it does not provide any information on the current status of the copy process. This can make users anxious not knowing if it’s done or not.
The Solutions
1. Running dd with the status option
This requires you to be running dd version 8.24 and above. If you are running a modern Linux distro you are most likely covered.
You can check your version with dd --version:
➤ dd --version
dd (coreutils) 8.32
Copyright (C) 2020 Free Software Foundation, Inc.
License GPLv3+: GNU GPL version 3 or later <https://gnu.org/licenses/gpl.html>.
This is free software: you are free to change and redistribute it.
There is NO WARRANTY, to the extent permitted by law.

Written by Paul Rubin, David MacKenzie, and Stuart Kemp.
We will also need to use oflag=sync to make sure that we are really syncing as data is being copied so we get a better sense of when it’s done. Otherwise dd goes blank at the end as it’s trying to sync.
Note: while using oflag=sync makes the copy slower, using a higher block size will help speed up the process (bs=4M instead of bs=1M)
In reality this should be option 1 as it gives a nicer output with a progress bar, ETA and other data. pv is a terminal-based tool for monitoring the progress of data through a pipeline. It can potentially be used with any pipe.
Add the function below to your ~/.bash_aliases and it will be available whenever you need. Call it with dd_iso [image] [device] and it will use pv if it’s already installed in your syste.
dd_iso ()
{
    usage="usage: dd_iso [image] [device]";
    if [[ $# -lt 2 ]]; then
        echo "$usage";
        return 0;
    else
        if [[ $# -eq 2 ]]; then
            iso="$1";
            device="$2";
        fi;
    fi;
    if [[ ${iso##*.} != iso && ${iso##*.} != img ]]; then
        echo "The first parameter should be an iso";
        return 1;
    else
        if [[ ! -b "$device" ]]; then
            echo "The second parameter needs to be a device";
            return 1;
        fi;
    fi;
    device_type="$(basename "$(readlink -f "/sys/class/block/${device##*/}/..")")";
    if [[ "$device_type" != "block" ]]; then
        echo "Do not specify a parition as the device";
        return 1;
    fi;
    sudo dd bs=4M if="$iso" of="$device" status=progress oflag=sync
}
This is a quick guide on how to configure and use SGID, SUID and the sticky bit on Linux. I will not get into a lot of details, but I will add comments and notes that might help you understand or overcome a few common issues.
SUID - Set-user Identification
When a command or script with SUID bit set is run, its effective UID becomes that of the owner of the file, rather than of the user who is running it.
-rws-----
Note: SUID does not work on scripts that start with a shebang (#!)
# chmod u+s [file]
-rwsr--r--. 1 root root 0 Mar 16 21:48 test

# chmod 4744 [file]
-rwsr--r--. 1 root root 0 Mar 16 21:48 test
Note: A capital ’S’ (-rwSr–r–) indicates that the execute bit is not set
SGID - Set-group identification
SGID permission is similar to the SUID permission. The main difference is that when a script or command with SGID set is run, it runs as if it were a member of the same group in which the file is a member.
-rwxr-sr--
Setting SGID
# chmod g+s [file]
-rwxr-sr--. 1 root root 0 Mar 16 21:48 test

# chmod 2754 [file]
-rwxr-sr--. 1 root root 0 Mar 16 21:48 test
Note: A capital ’S’ (-rwxr-Sr–) indicates that the execute bit is not set
Sticky bit
Anyone can write, but only the owner can delete the files (just like /tmp).
drwxrwxrwt
Sticky bit is usually set on directories. Setting the sticky bit on a folder does nothing (on Linux).
Setting sticky bit
# chmod o+t [dir]
-rwxr-r-t. 1 root root 0 Mar 16 21:48 test

# chmod 1755 [dir]
-rwxr-xr-t. 1 root root 0 Mar 16 21:48 test
Notes:
A capital ’T’ indicates that the execute bit is not set
You should give write permission to make sure that the target users can write to the folder
Additional Special Permissions
A . can represent special permissions (SELinux related).
-rw-rw-rw-.
A + indicates ACLs are applied.
-rw-rw-rw-+
Cheat Table
Mode
Octal
Symbolic
SUID
4755
u+s
SGID
2775
g+s
Sticky Bit
1777
o+t
Note: Octal mode is not an absolute translation to symbolic mode as symbolic changes only the specified permission set (user, group OR others), while octal overwrites all permission sets (user, group AND others)
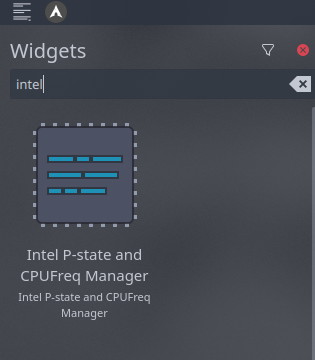
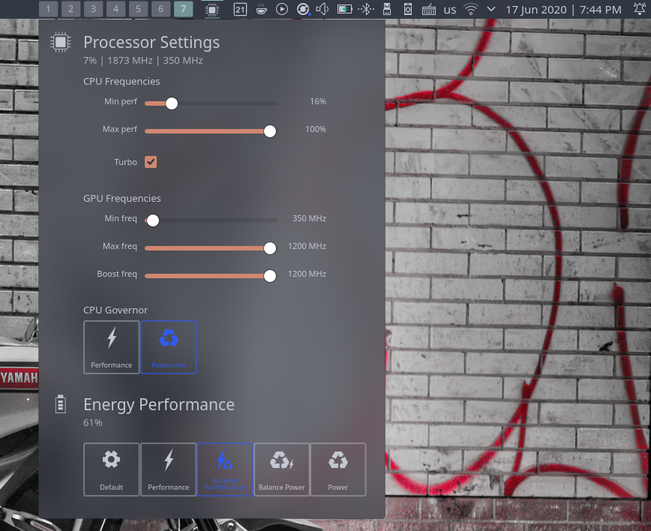
On this tutorial I will show you how to install and configure TLP and Intel P-state and CPUFreq Manager on your ThinkPad P1 Gen 2 (with KDE Arch).
If you don’t know, TLP allows you to configure specific rules to help optimize the battery life on your laptop, while Intel P-state and CPUFreq Manager gives you a pretty interface via a tray icon that allows you to control CPU/GPU frequencies and a few power profiles.
TLP
Using TLP’s threshold functionality we can change the charge thresholds for the battery. On ThinkPads the charging process is controlled by the embedded controller (EC) firmware (instead of software running on the operating system). Lenovo’s default settings start charging when the battery drops below 96%, and stops at 100%. This is good for “performance” but it deteriorates the battery causing a shorter lifespan. By changing the battery charge thresholds with TLP we can extend the lifespan of the battery.
Note: Lithium-ion batteries do not suffer from memory effect like NiCd and NiMH batteries. See the quote below (https://batteryuniversity.com) for an explanation
A lithium-ion battery provides 300-500 discharge/charge cycles. The battery prefers a partial rather than a full discharge. Frequent full discharges should be avoided when possible. Instead, charge the battery more often or use a larger battery. There is no concern of memory when applying unscheduled charges.
Installation
This part is very simple. Install the following packages and then reboot:
=> Main
tlp
acpi_call
smartmontools
=> AUR
tlpui-git
Configuration
a. Run tlpui and go to the ‘ThinkPad Battery’ tab on the left
b. Set the following parameters/options
START_CHARGE_THRESH_BAT0
Value = 50/60
This is the threshold of when the battery will start charging. If you set it to 50 the battery will only start charging when it’s below 50%.
STOP_CHARGE_THRESH_BAT0
Value = 70/80
This is the value of when the battery will stop charging. If you set it to 80 the battery will stop charging when close to %80.
RESTORE_THRESHOLDS_ON_BAT
Value = enabled
When you bypass the charge thresholds with a TLP command you would usually need to reboot your machine to reset the thresholds. When RESTORE_THRESHOLDS_ON_BAT is enabled the configured thresholds will be restored when the power is unplugged.
This is useful if you need to fully charge your battery for a meeting, or to work in a place where you know you won’t have a power outlet.
NATACPI_ENABLE
Value = enabled
TPACPI_ENABLE
Value = enabled
TPSMAPI_ENABLE
Value = disabled
tp_smapi doesn’t support newer models, so we need to disable this.
c. Go back to the ‘General’ tab and enable TLP_ENABLE
d. Click on ‘save’ and reboot
Additional TLP Commands
Get a full report from TLP
sudo tlp-stat
Get a report with battery information only
sudo tlp-stat -b
Temporarily bypass the current config and use specified threshold
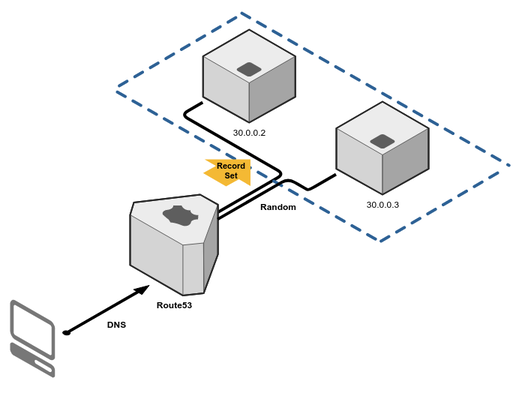
A quick explanation and visual overview of the AWS Route 53 policies (with the exception of Geoproximity Routing).
Simple Routing Policy
Use for a single resource that performs a given function for your domain, for example, a web server that serves content for the example.com website.
Important points to remember:
Simplest routing policy
Only one DNS record set
Multiple IP address per record set can be used
Values are returned to user in random order
No health checks
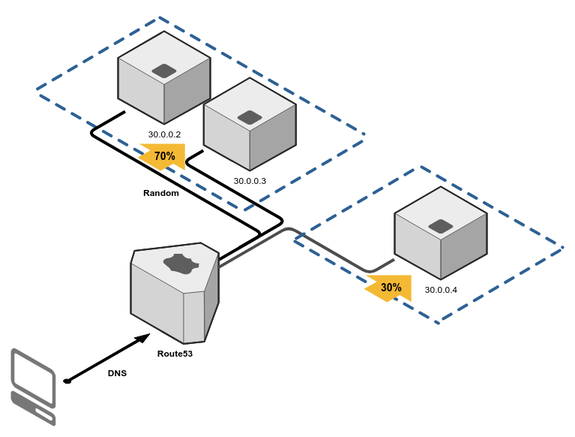
Weighted Routing Policy
Weighted Routing Policy controls the percentage of the requests that go to a specific endpoint.
Important points to remember:
Weighted routing sends user traffic based on the weight that you supply
You can split traffic between different regions
Multiple IP address per record set can be used
Health checks can be used
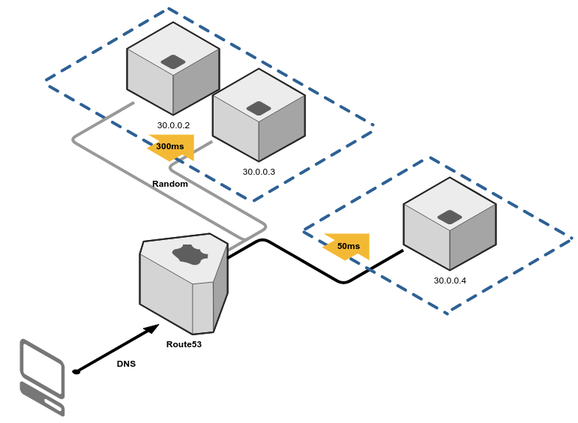
Latency Routing Policy
Use when you have resources in multiple AWS Regions and you want to route traffic to the region that provides the best latency.
Important points to remember:
Routing will be based on user to region latency
Multiple IP address per record set can be used
Health checks can be used
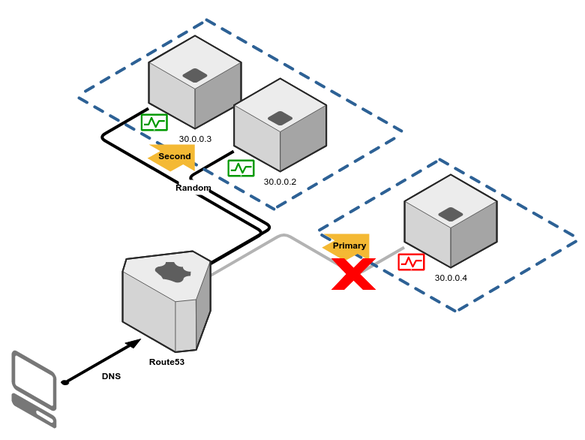
Failover Routing Policy
Use failover routing policy when you want to configure active-passive failover.
Important points to remember:
Use failover routing policy when you want to configure active-passive failover
Health checks
You can’t save the primary record without a health check
The secondary record can be created without a health check
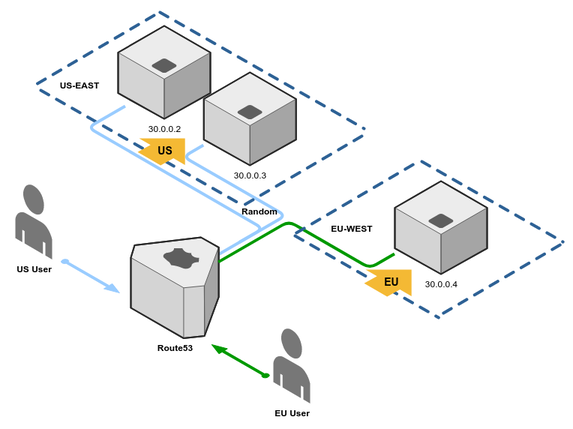
Geolocation Routing Policy
Geolocation routing lets you choose the resources that serve your traffic based on the geographic location of your users, meaning the location that DNS queries originate from.
Important points to remember:
This is routing based on user’s location
Multiple IP address per record set can be used
Health checks can be used
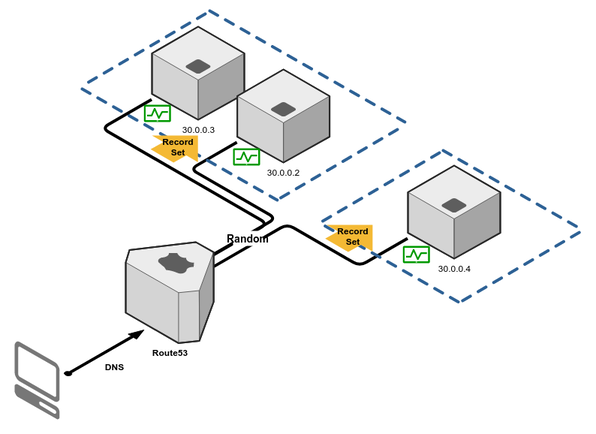
Multivalue Answer Routing policy
Use when you want Route 53 to respond to DNS queries with up to eight healthy records selected at random.
Important points to remember:
It’s very similar to simple routing, but with two differences: