Disclaimer
This blog post is essentially my study notes for the RHCSA v8 exam on Logical Volume Manager. It should be taken as a quick reference document (or a cheat sheet of some sorts).
It covers the following exam subjects:
- Configure local storage
- Create and remove physical volumes
- Assign physical volumes to volume groups
- Create and delete logical volumes
- Create and configure file systems
- Extend existing logical volumes
Note: There could be additional information needed for the exam that is not covered here.
Overview
Logical Volume Manager (LVM) is a device mapper target that provides logical volume management for the Linux kernel. LVM allows a pool of space to manage storage.
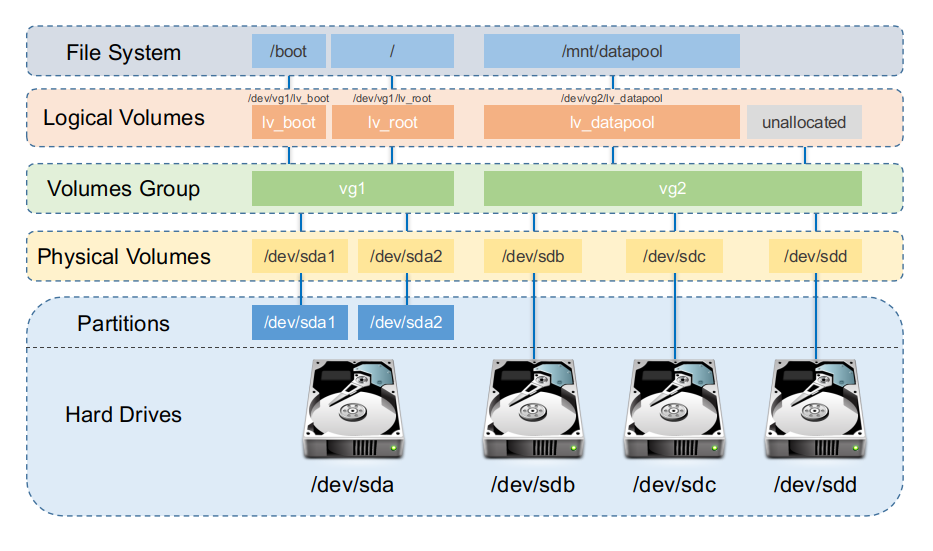
PV - Physical Volumes are directly related to hard drives or partitions
VG - A Volume Group can have multiple physical Volumes
LV - A Logical Volume sits inside a Volume Group and it’s what is assigned to a file system.
The filesystem sits on top of the logical volume and it will be formatted to a specifc fs type (vfat, xfs, ext4) and mounted (/root, /home, /mnt/*, etc).
When a physical disk is setup for LVM, metadata is written at the beginning of the disk for normal usage, and at the end of the disk for backup usage.
Overview of Creating a Physical Volume
First create initialize the disks to be used by LVM with pvcreate (Initialize physical volume(s) for use by LVM)
# pvcreate /dev/device /dev/device2 /dev/device3
Then we create a volume group with vgcreate (Create a volume group)
# vgcreate [vg name] /dev/device /dev/device2 /dev/device3
Optionally use the -s switch to set the Physical Extent size (for LVM2, the only effect this flag has is that when using too many physical volumes, the LVM tools will perform better)
Create the Logical Volume (4GB)
# lvcreate -L 4g [vg name] -n [lv name]
Flags:
-n- set the Logical Volume name-l- use extents rather than a specified size
And finally create the file system
# mkfs.xfs /dev/[vgname]/[lvname]
Working With LVM
Physical Volumes
Commands reference:
- lvm (8) - LVM2 tools
- pvcreate (8) - Initialize physical volume(s) for use by LVM
- pvdisplay (8) - Display various attributes of physical volume(s)
- pvremove (8) - Remove LVM label(s) from physical volume(s)
- pvs (8) - Display information about physical volumes
Creating Physical Volumes
Physical volumes can be created using full disks or partitions.
# pvcreate /dev/part1 /dev/part2
Or
# pvcreate /dev/sdb /dev/sdc
Deleting Physical Volumes
pvremove wipes the label on a device so that LVM will no longer recognize it as a PV. A PV cannot be removed from a VG while it is used by an active LV.
Removing a PV
# pvremove /dev/sdb /dev/sdc
  Labels on physical volume "/dev/sdb" successfully wiped.
  Labels on physical volume "/dev/sdc" successfully wiped.
Trying to remove a PV that has a VG and LV
# pvremove /dev/sdb /dev/sdc
  PV /dev/sdb is used by VG testvg so please use vgreduce first.
  (If you are certain you need pvremove, then confirm by using --force twice.)
  /dev/sdb: physical volume label not removed.
  PV /dev/sdc is used by VG testvg so please use vgreduce first.
  (If you are certain you need pvremove, then confirm by using --force twice.)
  /dev/sdc: physical volume label not removed.
You can try to force remove with -ff
# pvremove -ff /dev/sdb /dev/sdc
  WARNING: PV /dev/sdb is used by VG testvg.
Really WIPE LABELS from physical volume "/dev/sdb" of volume group "testvg" [y/n]? y
  WARNING: Wiping physical volume label from /dev/sdb of volume group "testvg".
  WARNING: PV /dev/sdc is used by VG testvg.
  Really WIPE LABELS from physical volume "/dev/sdc" of volume group "testvg" [y/n]? y
  WARNING: Wiping physical volume label from /dev/sdc of volume group "testvg".
Volume Groups
Commands reference:
- lvm (8) - LVM2 tools
- vgcreate (8) - Create a volume group
- vgdisplay (8) - Display volume group information
- vgextend (8) - Add physical volumes to a volume group
- vgreduce (8) - Remove physical volume(s) from a volume group
- vgremove (8) - Remove volume group(s)
- vgs (8) - Display information about volume groups
Creating a Volume Group
vgcreate creates a new VG on block devices. If the devices were not previously intialized as PVs with pvcreate, vgcreate will inititialize them, making them PVs. The pvcreate options for initializing devices are also available with vgcreate.
We create a volume group with vgcreate
# vgcreate [vg name] /dev/device /dev/device2 /dev/device3
For example:
# vgcreate vg1 /dev/sdb /dev/sdc
  Volume group "vg1" successfully created
Listing the volume group
# vgs vg1
  VG   #PV #LV #SN Attr   VSize   VFree
  vg1    2   0   0 wz--n-   5.99g 5.99g
Or with more details
# vgdisplay vg1
  --- Volume group ---
  VG Name               vg1
  System ID
  Format                lvm2
  Metadata Areas        2
  Metadata Sequence No  1
  VG Access             read/write
  VG Status             resizable
  MAX LV                0
  Cur LV                0
  Open LV               0
  Max PV                0
  Cur PV                2
  Act PV                2
  VG Size               5.99 GiB
  PE Size               4.00 MiB
  Total PE              1534
  Alloc PE / Size       0 / 0
  Free  PE / Size       1534 / 5.99 GiB
  VG UUID               uvHpRZ-BdPH-Nzxy-Lp15-VMps-fzPZ-A1bebc
You can also create a PV with vgcreate (bypassing the need to run pvcreate)
# vgcreate vg2 /dev/sdd
  Physical volume "/dev/sdd" successfully created.
  Volume group "vg2" successfully created
Extending a Volume Group
You can use vgextend to extend volume groups by adding physical volumes to it.
Initialize the new drive as a physical volume with pvcreate
# pvcreate /dev/sde
  Physical volume "/dev/sde" successfully created.
Then Add the new physical volume to the volume group
# vgextend vg1 /dev/sde
  Volume group "vg1" successfully extended
Reducing a Volume Group
vgreduce removes one or more unused PVs from a VG.
List the volume group (note it has 8.99GB of space)
# vgs vg1
  VG  #PV #LV #SN Attr   VSize  VFree
  vg1   3   0   0 wz--n- <8.99g <8.99g
Remove one of the physical volumes
# vgreduce vg1 /dev/sde
  Removed "/dev/sde" from volume group "vg1"
List the volume group again (now it has 5.99GB)
# vgs vg1
  VG  #PV #LV #SN Attr   VSize VFree
  vg1   2   0   0 wz--n- 5.99g 5.99g
Deleting/Removing a Volume Group
vgremove removes one or more VGs. If LVs exist in the VG, a prompt is used to confirm LV removal.
# vgremove vg1
  Volume group "vg1" successfully removed
Logical Volumes
Commands reference:
- lvm (8) - LVM2 tools
- lvcreate (8) - Create a logical volume
- lvdisplay (8) - Display information about a logical volume
- lvextend (8) - Add space to a logical volume
- lvresize (8) - Resize a logical volume
- lvreduce (8) - Reduce the size of a logical volume
- lvremove (8) - Remove logical volume(s) from the system
- lvs (8) - Display information about logical volumes
Creating a Logical Volume
# lvcreate -L 4g [vg name] -n [lv name]
Flags:
-n- set the Logical Volume name-l- use extents rather than a specified size
Example
Create the LV
# lvcreate -L 4g vg1 -n lv1
WARNING: ext4 signature detected on /dev/vg1/lv1 at offset 1080. Wipe it? [y/n]: y
  Wiping ext4 signature on /dev/vg1/lv1.
  Logical volume "lv1" created.
Display simple information about the LV
# lvs vg1
  LV   VG  Attr       LSize Pool Origin Data%  Meta%  Move Log Cpy%Sync Convert
  lv1  vg1 -wi-a----- 4.00g
Simple information with verbose
# lvs -v vg1
  LV   VG  #Seg Attr       LSize Maj Min KMaj KMin Pool Origin Data%  Meta%  Move Cpy%Sync Log Convert LV UUID                                LProfile
  lv1  vg1    2 -wi-a----- 4.00g  -1  -1  253    2                                                     ADUPcG-YAuo-5vDC-7FEB-Cas9-4Gt0-hR1kVD
Detailed information
# lvdisplay vg1
  --- Logical volume ---
  LV Path                /dev/vg1/lv1
  LV Name                lv1
  VG Name                vg1
  LV UUID                ADUPcG-YAuo-5vDC-7FEB-Cas9-4Gt0-hR1kVD
  LV Write Access        read/write
  LV Creation host, time localhost.localdomain, 2020-11-18 08:07:29 -0500
  LV Status              available
  # open                 0
  LV Size                4.00 GiB
  Current LE             1024
  Segments               2
  Allocation             inherit
  Read ahead sectors     auto
  - currently set to     8192
  Block device           253:2
Extending a Logical Volume
lvextend adds space to a logical volume. The space needs to be available in the volume group.
When extending Logical Volumes, you do not need to unmount the partition (however you will need to extend the file system afterwards, or if the filesystems supports, use the ‘-r’ flag to automatically resize the filesystem).
Checking for available space
Use vgs to see the available space of the volume group
# vgs vg1
  VG  #PV #LV #SN Attr   VSize  VFree
  vg1   3   1   0 wz--n- <8.99g <4.99g
                           |      |- Available VG space (not allocated to a LV)
                           |- Total size of VG
You can use lvs to confirm that the LV is using the difference of the previous values
# lvs vg1
  LV   VG  Attr       LSize Pool Origin Data%  Meta%  Move Log Cpy%Sync Convert
  lv1  vg1 -wi-a----- 4.00g
Or just use vgdisplay and check the PE sizes
# vgdisplay vg1 | grep 'PE /'
  Alloc PE / Size       1024 / 4.00 GiB
  Free  PE / Size       1277 / <4.99 GiB
Extending the Logical Volume
Extend volume to specified size (k/m/g)
# lvextend -L6G /dev/vg1/lv1
  Size of logical volume vg1/lv1 changed from 5.39 GiB (1381 extents) to 6.00 GiB (1536 extents).
  Logical volume vg1/lv1 successfully resized.
Extend the volume by 1GB
# lvextend -L+1G /dev/vg1/lv1
  Size of logical volume vg1/lv1 changed from 6.00 GiB (1536 extents) to 7.00 GiB (1792 extents).
  Logical volume vg1/lv1 successfully resized.
Extend for the full available space in the VG
# lvextend -l +100%FREE /dev/vg1/lv1
  Size of logical volume vg1/lv1 changed from 7.00 GiB (1792 extents) to <8.99 GiB (2301 extents).
  Logical volume vg1/lv1 successfully resized.
Note that lvextend -l 100%FREE /dev/vg1/lv1 (without the plus size) will not work
Extend to the percentage of the VG (60% or 8.99 = 5.394)
# lvextend -l 60%VG /dev/vg1/lv1
  Size of logical volume vg1/lv1 changed from 4.00 GiB (1024 extents) to 5.39 GiB (1381 extents).
  Logical volume vg1/lv1 successfully resized.
You can also use the ‘PE’ size
# lvextend -l +1740 /dev/RHCSA/pinehead
  Size of logical volume RHCSA/pinehead changed from <3.20 GiB (818 extents) to 9.99 GiB (2558 extents).
  Logical volume RHCSA/pinehead successfully resized.
Shrinking a Logical Volume
Be careful when reducing an LV’s size, because data in the reduced area is lost. Ensure that any file system on the LV is resized before running lvreduce so that the removed extents are not in use by the file system.
You can use two commands to shrink a logical volume:
- lvreduce reduces the size of an LV. The freed logical extents are returned to the VG to be used by other LVs.
- lvresize resizes an LV in the same way as
lvextendandlvreduce.
Shrink a logical volume by 2GB
# lvresize -L-2G /dev/vg1/lv1
  WARNING: Reducing active logical volume to <6.99 GiB.
  THIS MAY DESTROY YOUR DATA (filesystem etc.)
Do you really want to reduce vg1/lv1? [y/n]: y
  Size of logical volume vg1/lv1 changed from <8.99 GiB (2301 extents) to <6.99 GiB (1789 extents).
  Logical volume vg1/lv1 successfully resized.
Shrink a logical volume to 30% of the volume group size
# lvreduce -l 30%VG  /dev/vg1/lv1
  WARNING: Reducing active logical volume to <2.70 GiB.
  THIS MAY DESTROY YOUR DATA (filesystem etc.)
Do you really want to reduce vg1/lv1? [y/n]: y
  Size of logical volume vg1/lv1 changed from <6.99 GiB (1789 extents) to <2.70 GiB (691 extents).
  Logical volume vg1/lv1 successfully resized.
Deleting/Removing a Logical Volume
lvremove removes one or more LVs. For standard LVs, this returns the logical extents that were used by the LV to the VG for use by other LVs.
# lvremove /dev/vg1/lv1
Do you really want to remove active logical volume vg1/lv1? [y/n]: y
  Logical volume "lv1" successfully removed