For quite a while the RHCSA exam has covered topics related to boot targets and the famous root password reset. However, with the introduction of systemd and other related changes this can sometimes become a bit confusing. The methods that were once used for RHEL 6/7 may no longer be available or may not be the ‘official’ way of doing things anymore.
I will try to clear some of the differences so we can have a better understanding of what’s needed for the RHCSAv8 exam.
Exam Topics we will cover
Red Hat Certified System Administrator (RHCSA) exam objectives
Operate running systems
- Boot systems into different targets manually
- Interrupt the boot process in order to gain access to a system
Boot Targets
On this section I will cover topics related to the ‘Boot systems into different targets manually’ objective.
Olders SysV
SysV is an older startup mechanism that was used by many Unix-like operating systems. It was replaced by Systemd and it’s no longer used by Red Hat. However, you will sill find commands that references SysV and it’s run levels.
From Red Hat Enterprise Linux 3: Reference Guide
The SysV init runlevel system provides a standard process for controlling which programs init launches or halts when initializing a runlevel. SysV init was chosen because it is easier to use and more flexible than the traditional BSD-style init process.
The following runlevels are defined by default for Red Hat Enterprise Linux:
0 — Halt
1 — Single-user text mode
2 — Not used (user-definable)
3 — Full multi-user text mode
4 — Not used (user-definable)
5 — Full multi-user graphical mode (with an X-based login screen)
6 — Reboot
SysV Commands
You can find what runlevel the system currently is by executing the command runlevel
# runlevel
N 5
And you can change the system runlevel by running telinit with a runlevel number (0-6)
# telini 6
📝 NOTE: You should not be using SysV commands to change the runlevels. You should use systemd commands instead.
Systemd Targets
Systemd targets are similar to SysV runlevels, and they are what you should use/reference from now on (including for the RHCSAv8 exam).
From Arch Wiki
systemd uses targets to group units together via dependencies and as standardized synchronization points. They serve a similar purpose as runlevels but act a little differently. Each target is named instead of numbered and is intended to serve a specific purpose with the possibility of having multiple ones active at the same time.
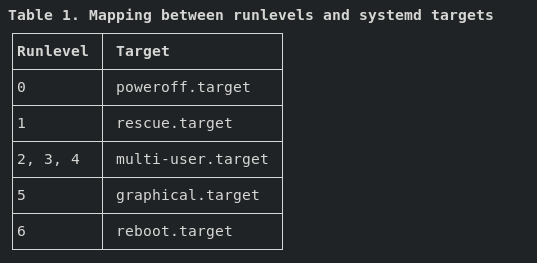
Runlevels and Systemd
While runlevels are not used anymore, they are still referenced (by older codes and such). Systemd provides a compatibility layer to it’s targets.
From runlevel man page
“Runlevels” are an obsolete way to start and stop groups of services used in SysV init. systemd provides a compatibility layer that maps runlevels to targets, and associated binaries like runlevel. Nevertheless, only one runlevel can be “active” at a given time, while systemd can activate multiple targets concurrently, so the mapping to runlevels is confusing and only approximate. Runlevels should not be used in new code, and are mostly useful as a shorthand way to refer the matching systemd targets in kernel boot parameters.
Working with Systemd Targets
Let’s go through the commands that will allow us to list, view and change the Systemd targets.
Listing the available targets
# systemctl list-units --type=target

UNIT                   LOAD   ACTIVE SUB    DESCRIPTION
basic.target           loaded active active Basic System
cryptsetup.target      loaded active active Local Encrypted Volumes
getty.target           loaded active active Login Prompts
graphical.target       loaded active active Graphical Interface
local-fs-pre.target    loaded active active Local File Systems (Pre)
local-fs.target        loaded active active Local File Systems
multi-user.target      loaded active active Multi-User System
network-online.target  loaded active active Network is Online
network-pre.target     loaded active active Network (Pre)
network.target         loaded active active Network
nfs-client.target      loaded active active NFS client services
nss-user-lookup.target loaded active active User and Group Name Lookups
paths.target           loaded active active Paths
remote-fs-pre.target   loaded active active Remote File Systems (Pre)
remote-fs.target       loaded active active Remote File Systems
rpc_pipefs.target      loaded active active rpc_pipefs.target
rpcbind.target         loaded active active RPC Port Mapper
slices.target          loaded active active Slices
sockets.target         loaded active active Sockets
sound.target           loaded active active Sound Card
sshd-keygen.target     loaded active active sshd-keygen.target
swap.target            loaded active active Swap
sysinit.target         loaded active active System Initialization
timers.target          loaded active active Timers
Get the current target
# systemctl get-default
graphical.target
Set the Systemd target for next boot
# systemctl set-default [target]
Change the Systemd target without reboot
# systemctl isolate [target]
Change into rescue/emergency mode
Note: This is related to the next session where we will cover rescue modes.
# systemctl isolate [rescue|emergency]

or

# systemctl [rescue|emergency]
Rescue Modes
This section is related to the ‘Interrupt the boot process in order to gain access to a system’ objective.
Rescue and emergency modes allow you to boot the OS with very few services running and perform administrative tasks to attempt to resolve/repair/recover the system.
There are different types of rescue and emergency modes:
- Legacy
- Boot Parameters:
rescueemergency
- Boot Parameters:
- Systemd
- Boot Parameters:
systemd.unit=rescue.targetsystemd.unit=emergency.target
- Boot Parameters:
- Installation program’s (Anaconda) rescue mode
- Requires install media
- Boot Parameters:
inst.rescue
rescue
Rescue mode provides a convenient single-user environment and allows you to repair your system in situations when it is unable to complete a regular booting process. In rescue mode, the system attempts to mount all local file systems and start some important system services, but it does not activate network interfaces or allow more users to be logged into the system at the same time.
Note: Equivalent to the old single user mode, where some services are started and every disk is mounted.
Boot Parameter:
- Legacy:
rescue - Systemd:
systemd.unit=rescue.target
Summary:
- Requires root password to enter this mode
- Mounts all local filesystems (RW)
- No network
- Starts important services
- Single-user mode
Instructions
a. At boot, hit e to edit the boot parameters
b. Add one of the boot parameters at the end of the line that starts with linux
c. Press ‘Ctrl + x’ to start
emergency
Emergency mode provides the most minimal environment possible and allows you to repair your system even in situations when the system is unable to enter rescue mode. In emergency mode, the system mounts the root file system in read only mode, does not attempt to mount any other local file systems, does not activate network interfaces, and only starts a few essential services.
Boot Parameter:
- Legacy:
emergency - Systemd:
systemd.unit=emergency.target
Summary:
- Requires root password to enter this mode
- Mounts the root filesystem only (RO)
- No network
- Only essential services are started
- The system does not load any init scripts
- Multi-user mode
Instructions
a. At boot, hit e to edit the boot parameters
b. Add one of the boot parameters at the end of the line that starts with linux
c. Press ‘Ctrl + x’ to start
rd.break
Breaks to an interactive shell while in the ‘initrd’ allowing interaction before the system disk is mounted. The main ‘/’ is available under ‘/sysroot’. Useful if you forgot root’s password.
Boot Parameter:
rd.break
Instructions
a. At boot, hit e to edit the boot parameters
b. Add rd.break option at the end of the line that starts with linux
c. Press ‘Ctrl + x’ to start
Anaconda rescue
The installation program’s rescue mode is a minimal Linux environment that can be booted from the Red Hat Enterprise Linux DVD or other boot media. It contains command-line utilities for repairing a wide variety of issues. Rescue mode can be accessed from the Troubleshooting menu of the boot menu. In this mode, you can mount file systems as read-only, blacklist or add a driver provided on a driver disc, install or upgrade system packages, or manage partitions.
Instructions
a. Boot the system from either minimal boot media, or a full installation DVD or USB drive, and wait for the boot menu to be displayed.
b. From the boot menu, either select Troubleshooting > Rescue a Red Hat Enterprise Linux system option, or append the inst.rescue option to the boot command line. To enter the boot command line, press the Tab key on BIOS-based systems or the e key on UEFI-based systems.
Password Reset
I will now cover different methods on how to change the root password if you forgot it. This is a common question for the RHCSA exams (or so I’ve heard as I have yet to take mine).
Method 1: Fixing SELinux context before reboot
This is not the “official” method, but it’s the one I like the most. It saves a bit of time from having to relabel the whole system for SELinux context.
a. Boot into rd.break mode
b. Re-mount sysroot in RW
switch_root:/# mount -o rw,remount /sysroot
c. Chroot into sysroot
switch_root:/# chroot /sysroot
d. Change the password for root
sh-4.4# passwd
e. Load the SELinux policies
sh-4.4# load_policy -i
f. Fix the policy for /etc/shadow
sh-4.4# restorecon -v /etc/shadow
g. Exit chroot
sh-4.4# exit
h. Remount as RO
switch_root:/# mount -o ro,remount /sysroot
i. Reboot
switch_root:/# reboot
Method 2: Setting autorelabel on reboot
This is the most common method that you will find online for the RHCSA exam. It’s also the method shown in Red Hat’s official documentation for RHEL 8.
a. Boot into rd.break mode
b. Re-mount sysroot in RW
switch_root:/# mount -o rw,remount /sysroot
c. Chroot into sysroot
switch_root:/# chroot /sysroot
d. Change the password for root
sh-4.4# passwd
e. Force the relabel of SELinux context for the filesystem
sh-4.4# touch /.autorelabel
f. Exit chroot
sh-4.4# exit
g. Remount as RO
switch_root:/# mount -o ro,remount /sysroot
h. Reboot
switch_root:/# reboot
Note: It takes a while for the system to relabel all the files with SELinux context.
Method 3: Setting SELinux to permissive and manually fixing the context
Links: Red Hat Learning Community - Fedora Documentation
With this method we temporarily set SELinux to permissive mode, make our password changes, reload the SELinux context for the shadow file, and then re-enable SELinux.
⚠️ WARNING: While this initially worked for me on RHEL 8 (you will get a lot of SELinux errors, which is expected), after a while my VM would hang and I could no longer login as any user or restart it.
a. Boot into rd.break mode by adding rd.break enforcing=0 to the boot line
b. Re-mount sysroot in RW
switch_root:/# mount -o rw,remount /sysroot
c. Chroot into sysroot
switch_root:/# chroot /sysroot
d. Change the password for root
sh-4.4# passwd
e. Exit chroot
sh-4.4# exit
f. Remount as RO
switch_root:/# mount -o ro,remount /sysroot
g. Exit switch_root and wait for the system to finish booting
switch_root:/# exit
h. As root, fix SELinux context for /etc/shadow
[root@localhost ~]# restorecon -v /etc/shadow
i. Set SELinux to enforcing mode
[root@localhost ~]# setenforce 1
Method 4: Disabling SELinux and manually fixing the context
This is very similar to method 3, however we are completely disabling SELinux.
⚠️ WARNING: This method did not work for me. My VM did not finish booting after making the changes.
a. Boot into rd.break mode by adding rd.break selinux=0 to the boot line
b. Re-mount sysroot in RW
switch_root:/# mount -o rw,remount /sysroot
c. Chroot into sysroot
switch_root:/# chroot /sysroot
d. Change the password for root
sh-4.4# passwd
e. Exit chroot
sh-4.4# exit
f. Remount as RO
switch_root:/# mount -o ro,remount /sysroot
g. Exit switch_root and wait for the system to finish booting
switch_root:/# exit
h. As root, fix SELinux context for /etc/shadow
[root@localhost ~]# restorecon -v /etc/shadow
i. Re-enable SELinux
[root@localhost ~]# setenforce 1
Conclusion
I hope I helped you make a bit more sense from all of the different options and info around this topic. If you have any comments, corrections or addition, please leave them below. I would love to hear from you.