So you got a spanking new hard drive for your NAS and you are ready to install it… but wait! What if the drive is bad?
This is not something that most people would think of, but that shiny new drive could already have come with defects (a.k.a extra features) from the factory. Or maybe it was part of a fun game of “throw the client’s package” that some delivery man like to play (as my preferred social media likes to show me). So before we install this new piece of hardware that has the potential to render all my data, accumulated from years of hoarding, useless, let’s do some testing.
S.M.A.R.T Testing
Let’s start with a S.M.A.R.T (Self-Monitoring, Analysis, and Reporting Technology) test.
SMART is an interface between the platform’s BIOS and the storage device. When SMART is enabled in the BIOS (mostly default), the BIOS can process information from the storage device and determine whether to send a warning message about potential failure of the storage device. The purpose of SMART is to warn a user of impending drive failure while there is still time to take action, such as backing up the data or copying the data to a replacement device.
First we need to identify if the drive is capable of S.M.A.R.T test. Most modern drives should be.
sudo smartctl -i /dev/sdX
You should get an output similar to the one below:
=== START OF INFORMATION SECTION ===
Device Model:     WDC WD60EFPX-68C5ZN0
Serial Number:    WD-WX12D12312345
LU WWN Device Id: 5 0014ee 26b395dd4
Firmware Version: 81.00A81
User Capacity:    6,001,175,126,016 bytes [6.00 TB]
Sector Sizes:     512 bytes logical, 4096 bytes physical
Rotation Rate:    5400 rpm
Form Factor:      3.5 inches
Device is:        Not in smartctl database 7.3/5528
ATA Version is:   ACS-3 T13/2161-D revision 5
SATA Version is:  SATA 3.1, 6.0 Gb/s (current: 6.0 Gb/s)
Local Time is:    Thu Nov  9 08:21:36 2023 EST
SMART support is: Available - device has SMART capability.
SMART support is: Enabled
I got the following error because I’m using a USB-C adapter:
smartctl 7.4 2023-08-01 r5530 [x86_64-linux-6.5.8-arch1-1] (local build)
Copyright (C) 2002-23, Bruce Allen, Christian Franke, www.smartmontools.org

/dev/sda: Unknown USB bridge [0x14b0:0x0200 (0x100)]
Please specify device type with the -d option.

Use smartctl -h to get a usage summary
If that’s the same for you, you can try using it with -d sat, and if your adapter is supported it should work.
sudo smartctl -d sat -i /dev/sdX
Once we confirmed that the drive supports S.M.A.R.T. testing we can start. We are interested in the following three tests:
Short - The goal of the short test is the rapid identification of a defective hard drive. Therefore, a maximum run time for the short test is 2 min
Long - The long test was designed as the final test in production and is the same as the short test with two differences. The first: there is no time restriction and in the Read/Verify segment the entire disk is checked and not just a section
Conveyance Test - This test can be performed to determine damage during transport of the hard disk within just a few minutes
We specify the test using the -t flag:
smartctl -t [short|long|conveyance] [dev]
The test runs in the background and we can check it’s status by greping Self-test execution status.
On the example below we can see that the test is in progress and that is 80% complete:
$ sudo smartctl -a /dev/sda | grep -A 1 'Self-test execution status:'
Self-test execution status:      ( 242)	Self-test routine in progress...
					20% of test remaining.
We can use the same command with to check the test result. Just change the -A to ‘2’ in grep:
$ sudo smartctl -a /dev/sda | grep -A 2 'Self-test execution status:'
Self-test execution status:      (   0)	The previous self-test routine completed
					without error or no self-test has ever
					been run.
Another option is to use the -l selftest flag:
$ sudo smartctl -l selftest /dev/sda
smartctl 7.4 2023-08-01 r5530 [x86_64-linux-6.5.8-arch1-1] (local build)
Copyright (C) 2002-23, Bruce Allen, Christian Franke, www.smartmontools.org

=== START OF READ SMART DATA SECTION ===
SMART Self-test log structure revision number 1
Num  Test_Description    Status                  Remaining  LifeTime(hours)  LBA_of_first_error
# 1  Short offline       Completed without error       00%        20         -
Also check the following string after each test:
$ sudo smartctl -a /dev/sda | grep 'test result'
SMART overall-health self-assessment test result: PASSED
Now go ahead and run the short and conveyance tests (or all 3 if you have the time). Here’s how long it took for me to run on a 6TB WD Red Plus (WD60EFPX) over USB-C (Nov 2023):
conveyance -1m13s
short - 2m
long - 11h20m
If you have more than one hard drive to test, and you can plug them in at the same time, you can run the tests in parallel.
Once completed and you have confirmed they have passed, also check the thresholds at the end of the output. It will look similar to this:
Offline_Uncorrectable - Damaged sectors that don’t respond to any read/write requests (bad sectors). These sectors are remapped to spare sectors.
Reallocated_Sector_Ct - Count of damaged sectors that were remapped to spare sectors.
Current_Pending_Sector - Indicates the number of damaged sectors that are yet to be remapped or reallocated. This number could indicate that spare sectors are not available, and data from bad sectors can no longer be remapped.
Badblocks
Before we continue, let’s just make sure that you are indeed testing a new set of spinning rust (a.k.a. hard drive), and not an SSD or an NVMe. We don’t want to run badblocks on the later 2.
S.M.A.R.T. (Self-Monitoring, Analysis, and Reporting Technology) is featured in almost every HDD still in use nowadays, and in some cases it can automatically retire defective HDD sectors. However, S.M.A.R.T. only passively waits for errors while badblocks can actively write simple patterns to every block of a device and then check them, searching for damaged areas (Just like memtest86* does with RAM).
Now that we have an understanding of what badblocks does, let’s take some time to digest it. We will be writing to all blocks on your new hard drive and then reading to confirm that the data was written correctly. As if that wouldn’t already take long, badblocks will do it not only once, but four times (with four different patterns).
As the pattern is written to every accessible block, the device effectively gets wiped. The default is an extensive test with four passes using four different patterns: 0xaa (10101010), 0x55 (01010101), 0xff (11111111) and 0x00 (00000000). For some devices this will take a couple of days to complete.
As with smartctl, you can run multiple instances of badblocks in parallel if you have multiple disks. You can also shorten the time of the test by increasing the number of blocks that are tested at time (-c), or by specifying a single pattern to be written with the -t option, e.g.: -t '0xaa', which will force it to do only one pass. If you specify multiple patterns, e.g.: -t '0xaa' -t '0x55', you will be essentially running multiple passes.
Another option is to use the random pattern option with -t random. This will make badblocks use random patterns for the test, with only one pass (unless you specify -p).
Just keep in mind that different patterns (used by the default write-mode) work better because you can validate against stuck bits. But based on the amount of drives, available drive buses, and time that you have, you might not actually be able to run the full test. But that’s a decision that only you can make.
I wanted to time my tests to help you making a decision, but as I ran them over a USB-C adapter my badblocks seem to have maxed out at around 41mb/s:
  Total DISK READ :       0.00 B/s | Total DISK WRITE :      41.74 M/s
  Actual DISK READ:       0.00 B/s | Actual DISK WRITE:      41.74 M/s
       TID  PRIO  USER     DISK READ  DISK WRITE  SWAPIN     IO>    COMMAND
  1516251 be/4 root        0.00 B/s   41.74 M/s  ?unavailable?  badblocks -wsvb 4096 -t 0x00 /dev/sda -o badblocks-output.log
With that in mind, here are the timings from my latest test on a 6TB WD Red Plus (WD60EFPX) over USB-C (Nov 2023):
Write mode - 83h
Random write mode - 81h
Write mode one pattern - 80h
And spoiler alert… we will be running the long test in smartctl once badblocks finishes. So also take that into account.
Running the Test
First, let’s take a look at what your drive’s recommended blocksize is:
sudo blockdev --getbsz /dev/sdX
Because this test will run for a while, start your preferred terminal multiplexer (e.g.: screen, tmux), change into root, and run badblocks:
time badblocks -wsvb {blocksize} /dev/sdX -o [output_file]
time a separate command to tell you the actual time badblocks ran for once complete.
-w uses write-mode test, which is a destructive action.
-s shows an estimate of the progress of the scan. This isn’t 100% accurate, but it’s better to see something than nothing at all.
-b {blocksize} specify the block size. Be sure to replace {blocksize} with the number you found with the previous command mentioned (blockdev --getbsz /dev/sdX).
/dev/sdX the drive you want to test. Replace with the actual drive. Be extra careful as you don’t want to accidentally destroy data on the wrong disk.
-v option is verbose mode
-o option is output file. Without the -obadblocks will simply use the STDOUT
S.M.A.R.T. Again
Once the badblocks test is complete, run another long smartctl test and check to make sure that everything is still good.
Migrating users from one Linux system to another can be a complex task, but with the right steps and careful planning, it can be accomplished smoothly. In this guide, we will walk you through the process of migrating users, their passwords, groups, and home folders from one Linux system to another. We’ll be using bash scripts to automate the backup and restore process, ensuring a seamless transition.
The following items will not be covered by our instructions:
User limits
Mail
Group password
Step 1: Backup User Information on the Source Server
First, log in to the source Linux system and open a terminal. Use the following command to get a list of all users:
Next, identify the users you want to migrate and add their names to the users_to_backup variable in the provided script:
backup_password_file="etc-passwd-bak"
backup_group_file="etc-group-bak"
backup_shadow_file="etc-shadow-bak"
# Add more users separated by spaces if needed
users_to_backup="linus lennart"

for user in $users_to_backup ; do
  curuser=$user
  echo -e "\n=> User is $curuser"
  curid=$(id -u "$curuser")
  curgid=$(id -g "$curuser")
  cursupgit=$(id -G "$curuser")
  echo "User id is $curid"
  echo "User group id is $curgid"
  echo "User supplementary groups are $cursupgit"
  echo "Backing up /etc/passwd for $curuser"
  grep -E "^${curuser}:.:${curid}" /etc/passwd >> "$backup_password_file"

  echo "Backing up primary group for $curuser"
  if [ -f "$backup_group_file" ] ; then
    if grep -q ":${curid}:" "$backup_group_file" ; then
      echo "Group already backed up"
    else
      grep ":${curid}:" /etc/group >> "$backup_group_file"
    fi
  else
    grep ":${curid}:" /etc/group >> "$backup_group_file"
  fi

  echo "Backing up secondary groups for $curuser"
  for groupid in $cursupgit ; do
    if grep -q ":${groupid}:" "$backup_group_file" ; then
      echo "Group already backed up"
    else
      grep ":${groupid}:" /etc/group >> "$backup_group_file"
    fi
  done

  echo "Backing up /etc/shadow for $curuser"
  sudo grep -E "^$curuser" /etc/shadow >> "$backup_shadow_file"
done
Save the script to a file, e.g., user_backup_script.sh, and make it executable:
chmod +x user_backup_script.sh
Execute the script as root:
sudo ./user_backup_script.sh
The script will back up user information, including passwords and group data, to the specified backup files.
Step 2: Copy Backup Files to the Destination Server
Next, copy the three backup files (etc-passwd-bak, etc-group-bak, and etc-shadow-bak) from the source server to the destination server using the scp command or any preferred method.
# Example using scp
scp etc-*-bak user@destination_server:/path/to/backup_files/
Step 3: Restore Users on the Destination Server
Log in to the destination Linux system and open a terminal. Navigate to the directory where the backup files are located and run the provided restore script as root:
backup_password_file="etc-passwd-bak"
backup_group_file="etc-group-bak"
backup_shadow_file="etc-shadow-bak"

echo -e "\n=> Backing up the system files"
for file in /etc/{passwd,group,shadow} ; do
  cp -v "$file" "${file}_$(date -I)"
done

echo -e "\n=> Restoring users"
cat "$backup_password_file" | while read -r line ; do
  userid="$(echo "$line" | awk -F":" '{print $3}')"
  username="$(echo "$line" | awk -F":" '{print $1}')"
  echo "-> Restoring user $username"
  if grep -Eq "^${username}:.:${userid}" /etc/passwd ; then
    echo "  ERROR: User ID already exists. Manual intervention is needed"
  else
    echo "$line" >> /etc/passwd
    if grep -qE "^${username}:" /etc/shadow ; then
      echo "  ERROR: User password already exists. Manual intervention is needed"
    else
      grep -E "^${username}:" "$backup_shadow_file" >> /etc/shadow
    fi
  fi
done

echo -e "\n=> Restoring groups"
cat "$backup_group_file" | while read -r line ; do
  groupid="$(echo "$line" | awk -F":" '{print $3}')"
  groupname="$(echo "$line" | awk -F":" '{print $1}')"
  echo "-> Restoring group $groupname"
  if grep -qE "^${groupname}:.:${groupid}" /etc/group ; then
    echo "  ERROR: Group already exists. Manual intervention may be needed"
  else
    echo "$line" >> /etc/group
  fi
done
Run the restore script:
sudo ./user_restore_script.sh
The script will restore the users and their passwords, taking care to avoid conflicts with existing user IDs. Pay close attention to error messages and take action if needed. If there are any error messages related to system group creation, it might be acceptable as the groups may already exist on the new system.
Step 4: Copy Home Folders and Set Permissions
Finally, to complete the migration, copy the home folders for the desired users from the source server to the destination server using rsync:
# Replace 'user1,user2,user3' with appropriate values
# Replace 'destination_server' with appropriate values
rsync -avzh -e ssh /home/{user1,user2,user3} user@destination_server:/home/
Ensure that the permissions and ownership are set correctly for the home folder of each user on the destination server:
# Replace user and primary_group with appropriate values
sudo chown -R user:primary_group /home/user
Note:For SFTP users that use CHROOT, the user’s home folder needs to be owned by ‘root’
Conclusion:
Migrating users from one Linux system to another involves a series of crucial steps, including backup, restoration, and copying of home folders. By using the provided scripts and following this step-by-step guide, you can ensure a smooth and successful user migration process. Always exercise caution during the migration and verify the results to ensure everything is functioning as expected on the destination system.
When it comes to managing packages on a Linux system, the YUM (Yellowdog Updater Modified) package manager is widely used for its ease of use and robust features. One of the handy commands in YUM is yum clean all, which helps you keep your system clean and optimized. In this blog post, we will delve into the functionalities of yum clean all and explore how it can help you clear accumulated cache and improve system performance.
Cleaning Options
The yum clean command can be used with specific options to clean individual components. Here are some of the available options:
packages: Cleans package-related cache files
metadata: Removes metadata and other files related to enabled repositories
expire-cache: Cleans the cache for metadata that has expired
rpmdb: Cleans the YUM database cache
plugins: Clears any cache maintained by YUM plugins
all: Performs a comprehensive cleaning, covering all the above options
Clean Everything
The yum clean all command serves as a one-stop solution to clean various elements that accumulate in the YUM cache directory over time. It offers several cleaning options, allowing you to target specific items or perform a comprehensive clean.
It’s essential to note that yum clean all does not clean untracked “stale” repositories. This means that if a repository is no longer in use or has been disabled, its cache will not be cleared by this command. We’ll explore an alternative method to handle untracked repositories shortly.
Analyzing Cache Usage
Before diving into the cleaning process, it’s helpful to analyze the cache usage on your system. You can use the following command to check the cache usage:
$ df -hT /var/cache/yum/

Filesystem               Type  Size  Used Avail Use% Mounted on
/dev/mapper/rootvg-varlv xfs   8.0G  4.6G  3.5G  57% /var
Cleaning with ‘yum clean all’
When you execute yum clean all, the command will remove various cached files and improve system performance. However, you may sometimes notice a warning regarding other repository data:
Other repos take up 1.1 G of disk space (use --verbose for details)
If you run it with the --verbose flag, you should see a list of stale/untracked repos
$ sudo yum clean all --verbose

Not loading "rhnplugin" plugin, as it is disabled
Loading "langpacks" plugin
Loading "product-id" plugin
Loading "search-disabled-repos" plugin
Not loading "subscription-manager" plugin, as it is disabled
Adding en_US.UTF-8 to language list
Config time: 0.110
Yum version: 3.4.3
Cleaning repos: epel rhel-7-server-ansible-2-rhui-rpms rhel-7-server-rhui-extras-rpms rhel-7-server-rhui-optional-rpms rhel-7-server-rhui-rh-common-rpms rhel-7-server-rhui-rpms
              : rhel-7-server-rhui-supplementary-rpms rhel-server-rhui-rhscl-7-rpms rhui-microsoft-azure-rhel7
Operating on /var/cache/yum/x86_64/7Server (see CLEAN OPTIONS in yum(8) for details)
Disk usage under /var/cache/yum/*/* after cleanup:
0      enabled repos
0      disabled repos
1.1 G  untracked repos:
  1.0 G  /var/cache/yum/x86_64/7Server/rhui-rhel-7-server-rhui-rpms
  90 M   /var/cache/yum/x86_64/7Server/rhui-rhel-server-rhui-rhscl-7-rpms
  9.8 M  /var/cache/yum/x86_64/7Server/rhui-rhel-7-server-rhui-extras-rpms
  6.4 M  /var/cache/yum/x86_64/7Server/rhui-rhel-7-server-rhui-supplementary-rpms
  5.3 M  /var/cache/yum/x86_64/7Server/rhui-rhel-7-server-dotnet-rhui-rpms
  1.6 M  /var/cache/yum/x86_64/7Server/rhui-rhel-7-server-rhui-rh-common-rpms
4.0 k  other data:
  4.0 k  /var/cache/yum/x86_64/7Serve
Manually Removing Untracked Repository Files
To handle untracked repository files, you can manually remove them from the cache directory with rm:
$ sudo rm -rf /var/cache/yum/*
Refreshing the Cache
Next time you run commands like yum check-update or any other operation that refreshes the cache, YUM will rebuild the package list and recreate the cache directory for the enabled repositories.
Check the Cache Usage After Cleanup
After performing the cleanup, you can verify the reduced cache usage. Use the df command again to check the cache size:
$ df -hT /var/cache/yum/
Doing it all with Ansible
And if you want to, you can use the Ansible playbook below to automate the YUM cache purge and re-creation:
Regularly cleaning the YUM cache with the yum clean all command can help optimize your system’s performance by clearing accumulated files. By understanding the available cleaning options and handling untracked repositories, you can ensure that your YUM cache remains streamlined and efficient. Keep your system running smoothly and enjoy the benefits of a clean YUM cache!
Remember, maintaining a clean and optimized system contributes to a seamless Linux experience.
The Linux find command is a very versatile tool in the pocket of any Linux administrator. It allows you to quickly search for files and take action based on the results.
The basic construct of the command is:
find [options] [path] [expression]
The options part of the command controls some basic functionality for find and I’m not going to cover it here. I will instead quickly look at the components for the expression part of the command, and provide some useful examples.
Expressions are composed of tests, actions, global options, positional options and operators:
Test - returns true or false (e.g.: -mtime, -name, -size)
Actions - Acts on something (e.g.: -exec, -delete)
Global options - Affect the operations of tests and actions (e.g.:-depth, -maxdepth,)
Positional options - Modifies tests and actions (e.g.: -follow, -regextype)
Operators - Include, join and modify items (e.g.: -a, -o)
Operators
Operators are the logical OR and AND of find, as well as negation and expression grouping.
Operator
Description
\( expr \)
Force precedence
! or -not
Negate
-a or -and
Logical AND. If two expressions are given without -a find will take it as implied. expr2 is not evaluated if expr1 is false
-o of -or
Logical OR. expr2 is not evaluated if expr1 is true
,
Both expr1 and expr2 are always evaluated. The value of expr1 is discarded
You can use the operators for repeated search options with different values.
Example 1: Find files with multiple file extensions
Example 3: find files that don’t finish with the ‘.log’ extension
find . -type f -not -name '*.log'
Example 4: Excludes everything in the folder named ‘directory’
find -name "*.js" -not -path "./directory/*"
Global Options
Two very useful global options are -maxdepth and -mindepth.
maxdepth levels: Descend at most levels (a non-negative integer) levels of directories below the starting-points. -maxdepth 0 means only apply the tests and actions to the starting-points themselves.
mindepth levels: Do not apply any tests or actions at levels less than levels (a non-negative integer). -mindepth 1 means process all files except the starting-points.
Example 5: find all files with ‘.txt’ extension on the current dir and do not descend into subdirectories
find . -maxdepth 1 -name '*.txt'
Tests
This is where you can target specific properties about the files that you are searching for. Some of my preferred tests are:
-iname - Like -name, but the match is case insensitive
-size - Matches based on size (e.g.: -size -2k, -size +1G)
-user - File Belongs to username
-newer - File is newer than file. It can be a powerful option
Example 6: Find files for user
find . -type f -user linustorvalds
Example 7: Find files larger than 1GB
find . -type f -size +1G
Example 8: Here’s a hidden gem! Let’s say you need to find what files a program is creating. All you need to do is create a file, run the program, and then use -newer to find what files were created
# Create a file
touch file_marker

# Here I run the script or program
./my_script.sh

# Now I can use the file I created to find newer files that were created by the script
find . -type f -newer 'file_marker'
Actions
Actions will execute the specified action against the matched filenames. Some useful actions are:
-ls - Lists matched files with ls -dils
-delete - Deletes the matched files
-exec - Execute the specified command against the files
-ok - Prompts user for before executing command
-print0 - Prints the full name of the matched files followed by a null character
Real-life Scenarios
Get a confirmation prompt
Use -ok to get a confirmation prompt before executing the action on the matched files.
Whenever possible, use -delete instead of -exec rm -rf {} \;.
find . -type f -name "*.bak" -exec rm -f {} \;
Instead use:
find . -type f -name "*.bak" -delete
Using xargs and {} +
The command bellow will run into a problem if files or directories with embedded spaces in their names are encountered. xargs will treat each part of that name as a separate argument:
That final + tells find that grep will accept multiple file name arguments. Like xargs, find will put as many names as possible into each invocation of grep.
Find and Move
Find files and move them to a different location.
-v - For verbose
-t - Move all SOURCE arguments into DIRECTORY
-exec command {} + - As we saw before, this variant of the -exec action runs the specified command on the selected files, but the command line is built by appending each selected file name at the end; the total number of invocations of the command will be much less than the number of matched files
Here we search the contents of PDF files for specif text. Two options are shown below, each require the install of an additional package (pdfgrep and ripgrep-all).
One of the problems with find is that it doesn’t return true or false based on search results. But we can still use it on our if condition by greping the result.
if find /var/log -name '*.log' | grep -q log ; then
  echo "File exists"
fi
Conclusion
You should now have a better understanding of the find command, as well as some nifty use cases to impress you co-workers.
If you found something useful or want to share an interesting use for find, please leave a comment below.
If you haven’t heard about Ansible Molecule you came to the right place. I will cover what it is, it’s basic usage, and how to install it and get started.
What it is
Ansible Molecule is a project (tool) that can greatly improve your Ansible workflow. It allows you to automate your tasks (which is great for CI) by providing means of running different and idempotent tests against your roles.
And Molecule is based on Ansible, so you are essentially using Ansible to test Ansible. How cool is that!?
What it does
To put it in simple words, Molecule tests your code. With Molecule you can easily run multiple tests against your code and make sure it works before deploying to an environment.
Some of the tests you can run are:
Yaml lint
Ansible lint
Ansible syntax
Run the Ansible role against a virtual machine
Test idempotence (run the same Ansible role against the same virtual machine for the second time)
Folder Structure
When invoked Molecule creates a single role folder with the usual Ansible structure. Inside this role folder an additional molecule folder is created. This is where the main Molecule configuration lives.
Test scenarios can be configured inside the molecule folder and each scenario should have it’s own folder.
A ‘default’ scenario is created automatically with the following tests enabled (you can change them according to your needs):
lint
destroy
dependency
syntax
create
prepare
converge
idempotence
side_effect
verify
destroy
Drivers
Three different drivers (Vagrant, Docker, and OpenStack) can be used to create virtual machines. These virtual machines are used to test our roles.
On this tutorial we will be using Docker as our driver.
Installing Molecule
Molecule can be installed via pip or with distro packages (depending on your distro). You can mix and match and install Molecule via pip and specific components (like ansible or ansible-lint) via your distro’s package manager.
Notes:
On Windows Molecule can only be installed via WSL
I’m assuming you already have Ansible installed and will not cover it here
Windows Install (Ubuntu WSL)
On Ubuntu Molecule needs to be installed via pip. If perhaps you are running another distro in WSL, you can check if the packages are available with your package manager (if you choose to install that way).
Install python-pip.
$ sudo apt install -y python-pip
Create a python virtual environment for Molecule. The software we are going to install will reside in the virtual environment (we can use the environment many times).
$ python3 -m venv molecule
Activate the environment (see that the prompt changes).
$ source molecule/bin/activate
(molecule-venv) $
Install the wheel package.
(molecule-venv) $ python3 -m pip install wheel
Install ansible and ansible-lint. You can do this via Python/Molecule, or via the OS.
OS
$ apt install ansible ansible-lint
Via molecule
(molecule-venv) $ python3 -m pip install "molecule[ansible]" # or molecule[ansible-base]
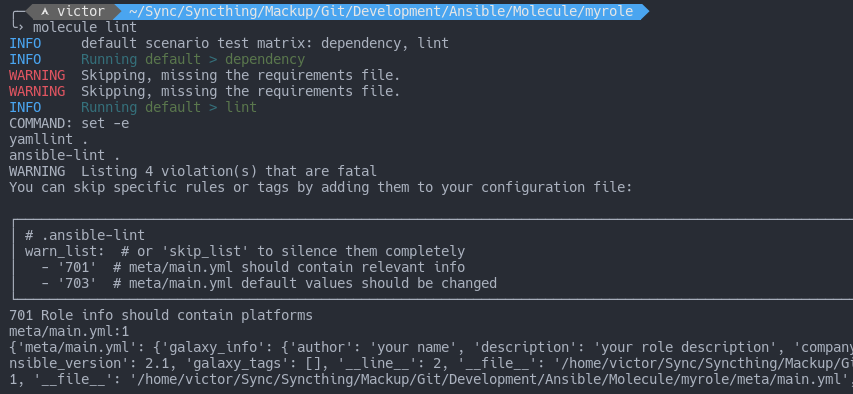
Now run molecule lint. You should get a lot of warnings due to to information missing in the meta folder:
As instructed by the output of the command, you can quiet or disable the messages by adding a warn_list or skip_list to .ansible_lint
Tip: You can also fine tune yaml linting by editing .yamllint
Running a Full Test
So far we have only run two tests:
Converge (dependency, create, prepare converge)
Lint (yaml lint and Ansible lint)
Let’s run a full test (default scenario) on our role. Remember, the full test will run dependency, lint, syntax, create, prepare, converge, idempotence, side_effect, verify, cleanup and destroy.
Run molecule test.
Running Roles from Another Folder
You can also use Molecule to test roles from another folder (which makes molecule very flexible for testing).
Let’s say I have the following folder structure:
.
└── Ansible
    ├── Molecule
    └── web-project
Inside my web-project folder I have a role called ‘apache’ that installs (guess what?) httpd.
lint: |
  set -e
  yamllint ../../web-project
  ansible-lint ../../web-project
And then run molecule converge (from the Molecule role folder) to test. Because molecule converge does not include the destroy command, I can login to the container ( with molecule login) and check if httpd was installed:
Tip:
When testing against multiple containers you can use molecule login --host [container name]
You can also use docker cli to connect to the container - docker exec -ti [container name] /bin/bash
Note: On this example nothing other than the role is imported (e.g. variables and config from ansible.cfg are not imported)
Additional Container Configuration
We can configure different options for our container in molecule.yml under the platforms key section. Configuration here is similar to a docker compose file.
name - Name of the container
image - Image for the container. Can be local or from a remote registry
pre_build_image - Instructs to use pre-build image (pull or local) instead of building from molecule/default/Dockerfile.j2
privileged - Give extended privileges (a “privileged” container is given access to all devices)
capabilities - Same as --cap-add=SYS_ADMIN. Grants a smaller subset of capabilities to the container compared to the privileged option
command - Same as Dockerfile RUN
groups - Assigns the container to one or more Ansible groups
I’m hoping I was able to provide you with enough information on how to get started with Molecule. If you have any comments, suggestions or corrections, please leave them in the comment box below.