After having bad memory modules due to power outages at home (on both my FreeNAS and my desktop) I knew I had to invest on a UPS. I will cover the details of the configuration, and as usual, I will try to go straight to the point.
Keep in mind that I’m running Arch on my desktop and FreeNAS-11.3-U1, and that the UPS is connected to my desktop (master) via USB.
Instructions
Hardware
a. Connect the USB cable to your computer
b. Make sure that you can see it with lsusb
➤ lsusb | grep -i ups
Bus 002 Device 008: ID 0764:0501 Cyber Power System, Inc. CP1500 AVR UPS
Desktop
Configuring the UPS
a. Start by installing nut and nut-monitor (if you want a nice GUI to view UPS status)
local/nut 2.7.4-2
    A collection of programs which provide a common interface for monitoring and administering UPS, PDU and SCD
    hardware

local/nut-monitor 2.7.4-3
    GUI to manage devices connected a NUT server
b. Next run nut-scanner to see if identifies your UPS. This will give a start configuration that we can use for the UPS
➤ sudo nut-scanner -U
Scanning USB bus.
[nutdev1]
	driver = "usbhid-ups"
	port = "auto"
	vendorid = "0764"
	productid = "0501"
	product = "SL Series"
	vendor = "CPS"
	bus = "002
c. Edit /etc/nut/ups.conf and add the output from the previous step. You can change the device name (between []) to anything you like
Tip: If you only have one UPS keep the name simple so it’s easy for your to remember and type it in the terminal.
[CyberPowerSL700U]
	driver = "usbhid-ups"
	port = "auto"
	vendorid = "0764"
	productid = "0501"
	product = "SL Series"
	vendor = "CPS"
	bus = "002"
d. Start the USB driver
➤ sudo upsdrvctl start
d.1. If you get an error here you might need to setup a udev rule for your UPS. This can be done by creating the file /etc/udev/rules.d/50-ups.rules with the content below
SUBSYSTEM=="usb", ATTR{idVendor}=="XXXX", ATTR{idProduct}=="YYYY", SYMLINK+="ups0", GROUP="nut"
Make sure to add the vendor ID and product ID for the UPS (both lsusb and nut-scanner -U can provide that info). This what mine looks like:
➤ cat /etc/udev/rules.d/50-ups.rules
SUBSYSTEM=="usb", ATTR{idVendor}=="0764", ATTR{idProduct}=="0501", SYMLINK+="ups0", GROUP="nut"
d.2. After that reload udev rules and try to start the UPS USB driver again
➤ sudo udevadm control --reload-rules && sudo udevadm trigger
➤ sudo upsdrvctl start
e. Make sure that you can view the UPS status with upsc
➤ upsc CyberPowerSL700U
battery.charge: 100
battery.charge.low: 10
battery.charge.warning: 20
battery.mfr.date: CPS
battery.runtime: 599
battery.runtime.low: 300
battery.type: PbAcid
battery.voltage: 14.2
battery.voltage.nominal: 12
device.mfr: CPS
device.model: SL Series
device.type: ups
driver.name: usbhid-ups
driver.parameter.bus: 002
driver.parameter.pollfreq: 30
driver.parameter.pollinterval: 2
driver.parameter.port: auto
driver.parameter.product: SL Series
driver.parameter.productid: 0501
driver.parameter.synchronous: no
driver.parameter.vendor: CPS
driver.parameter.vendorid: 0764
driver.version: 2.7.4
driver.version.data: CyberPower HID 0.4
driver.version.internal: 0.41
input.transfer.high: 140
input.transfer.low: 96
input.voltage: 115.0
input.voltage.nominal: 0
output.voltage: 115.0
ups.beeper.status: enabled
ups.delay.shutdown: 20
ups.delay.start: 30
ups.load: 44
ups.mfr: CPS
ups.model: SL Series
ups.productid: 0501
ups.realpower.nominal: 375
ups.status: OL
ups.timer.shutdown: -60
ups.timer.start: -60
ups.vendorid: 0764
Configuring the NUT Server
We are going to configure it as the master (meaning that it will send the shutdown command to the listening clients when the battery is low).
Info: If you want to know what the shutdown process looks like, take a look at the Official NUT Document: Shutdown design
a. Edit /etc/nut/nut.conf and set the MODE to netserver
MODE=netserver
b. Now let’s configure the listening IP and port. Edit /etc/nut/upsd.conf, edit theLISTEN directive as below:
LISTEN 0.0.0.0 3493
c. Configure the users in /etc/nut/upsd.users
Add passwords under my_master_password and my_slave_password
[upsmaster]
  # Administrative user
  password = my_master_password

  # Allow changing values of certain variables in the UPS
  actions = SET

  # Allow setting the "Forced Shutdown" flag in the UPS
  actions = fsd

  # Allow all instant commands
  upsmon master

[upsremote]
  password = my_slave_password
  upsmon slave
d. Now let’s tell upsmon to monitor the UPS. Edit /etc/nut/upsmon.conf with the lines below
Make sure to change the UPS name (ups_name) and master password (my_master_password)
MONITOR ups_name@localhost 1 [master user] [master password] master
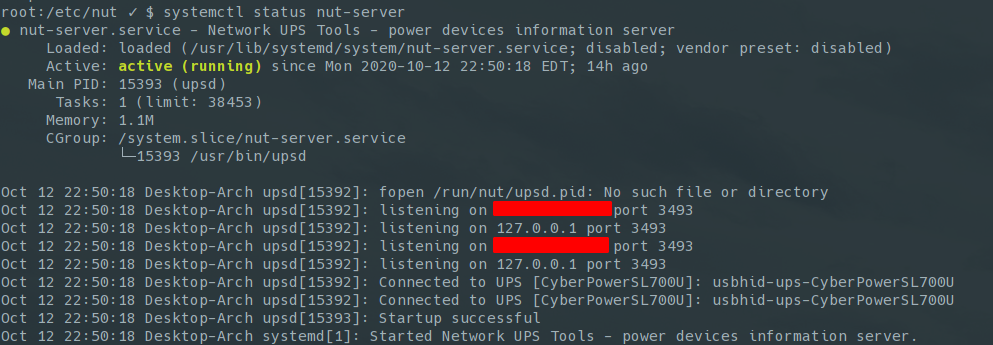
e. Check the status of the NUT server with systemctl status nut-server
f. Enable the NUT server and monitor
➤ sudo systemctl enable --now nut-server.service
➤ sudo systemctl enable --now nut-monitor.service
Timing
It’s important that we understand how the shutdown process works, and how much time each of the slaves take to power down. At the end of the process the master node will send a shutdown command to the UPS, and the last thing we want is to cutoff power to one of our slaves.
I have 3 devices connected to my UPS. I have timed their shutdown so I now how much time I need:
- Desktop - 30s
- FreeNAS - 60s (without drives)
- CentOS - 30s
On top of that, I also need to take in consideration the UPS low battery run time (what the low battery threshold is and how long it can run), and what the shutdown delay should be.
Oversimplified chronogram
UPS       |####################### Low Battery Run Time ######################|
          |                             ########### Shutdown Delay ###########|
          |
Master    |######### Shutdown ##########|
(Desktop) |
          |
Slave1    |####################### Shutdown #########################|
(FreeNAS) |
          |
Slave2    |########## Shutdown ##########|
(Centos)  |
          -------------------------------|---------------------------|--------|
   Time                                 30s                         60s      90s
Let’s get started
a. Start by timing your device with a normal shutdown
b. Now we can change our configuration, and that will vary with your device
Option 1: Use upsrw
You can use upsrw to set the variable, but that sometimes will not work as it only sets the value for the OS and doesn’t write back to the UPS (which is the same for all 3 cases). The variables we are looking for are:
battery.charge.low- Threshold in battery percentage that the UPS should change it’s status to LB (low battery)battery.runtime.low- Threshold in battery run time (seconds) that the UPS should change it’s status to LB (low battery)ups.delay.shutdown- Additional delay after the Master has shutdown and the UPS will wait to cutoff power (the important one we just covered)ups.delay.start- This is how long the UPS should wait to restore power. For home use I usually set this to high
You can set them with upsrw -s [variable=value] -u [UPS admin user] [ups name]. For example:
upsrw -s ups.delay.shutdown=60 -u upsmaster CyberPowerSL700U
⚠️ WARNING: The main problem with this process is that it does not survive restarts.
Option 2: Use the override directive
You can use the override directive in /etc/nut/ups.conf to override levels reported back from the UPS. Similar to the option above, this will only update the outside world (the master device and not the UPS itself). See UPS.CONF(5) for more info.
Option 3: Use offdelay
This is the method that worked the best for my battery model. I have configured the following 3 variables in /etc/nut/ups.conf.
offdelay- How long to wait to cut power - overridesups.delay.shutdownondelay- How long to wait before turning on devices again -overrides ups.delay.startlowbatt- Overridesbattery.charge.low
Here’s my updated /etc/nut/ups.conf
[CyberPowerSL700U]
	driver = "usbhid-ups"
	port = "auto"
	vendorid = "0764"
	productid = "0501"
	product = "SL Series"
	vendor = "CPS"
	bus = "002"
  offdelay = "90" # How long to wait to cut power - overrides ups.delay.shutdown
  ondelay = "50" # How long to wait before turning on devices again - overrides ups.delay.start
  lowbatt = "30" # Overrides battery.charge.low
c. Restart nut-server.service
➤ sudo systemctl restart nut-server.Services
Configuring FreeNAS as the client/slave
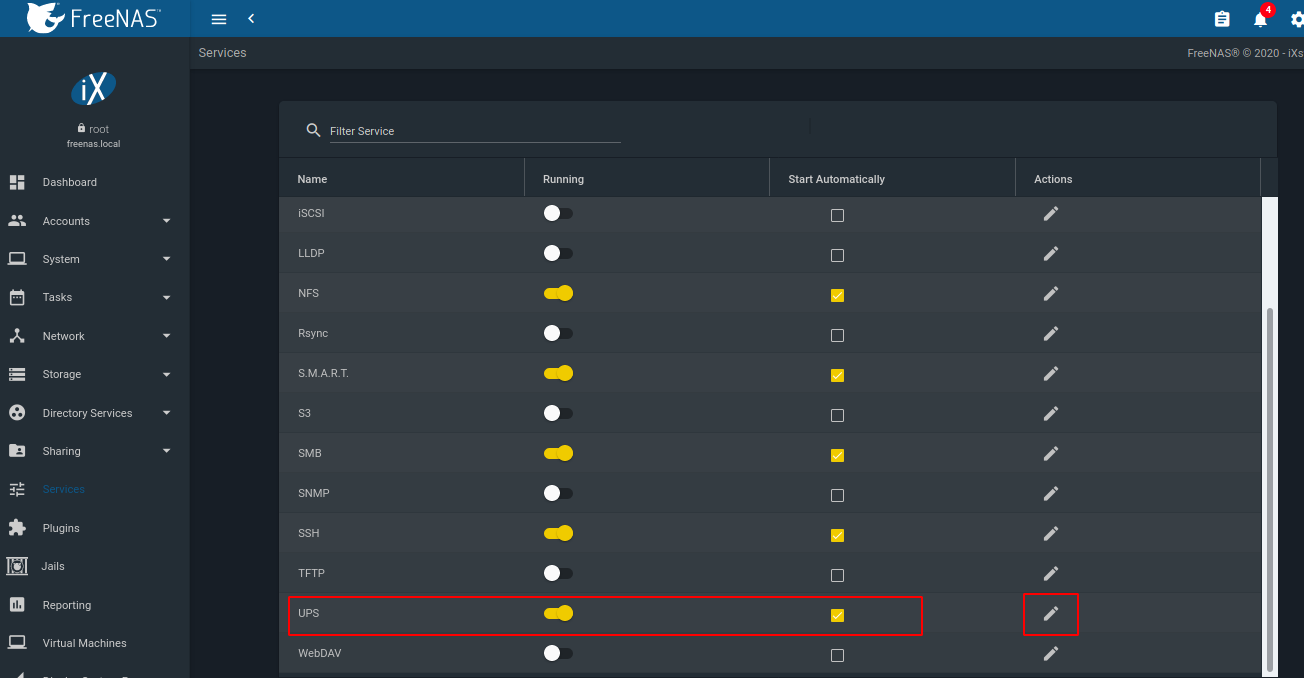
a. Login to your FreeNAS and go to Services. Enable the UPS service, set it to start automatically and then click on the edit button
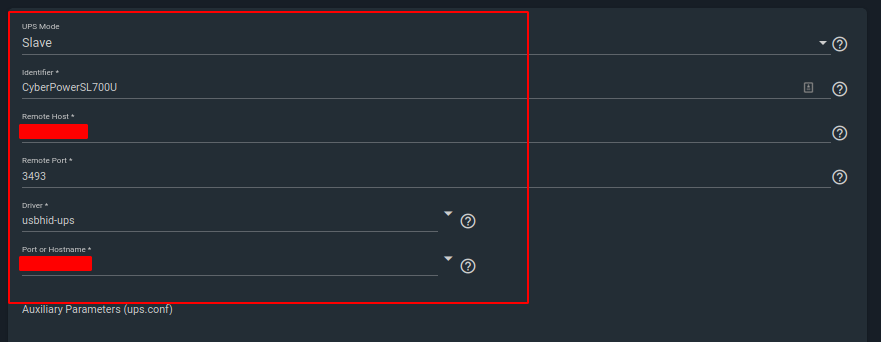
b. Make the following configuration
- UPS Mode - Slave
- Identifier - Name for the UPS
- Remote Host - IP of the master
- Remote Port - Port
- Driver - Look for your UPS model. I could not find my model, so I typed in the driver that I’m using on the master host (usbhid-ups) *
- Port or Hostname - Hostname of the master host
⚠️ WARNING: While this allowed me to save my configuration and the shutdown works, when I access the config page the driver field is blank. This is different than on older versions of FreeNAS where the driver option was only available in Master mode. Beware that it may create problems if you also decide to go this route.
- Shutdown Mode - I chose ‘UPS reaches low battery’
- Shutdown Timer - 30 (default)
- Shutdown Command - I’m using
/sbin/shutdown -p now - No Communication Warning Time - 60 (default)
- Monitor User - The slave user you configured in
ups.confon the master - Monitor Password - The slave password you configured in
ups.confon the master
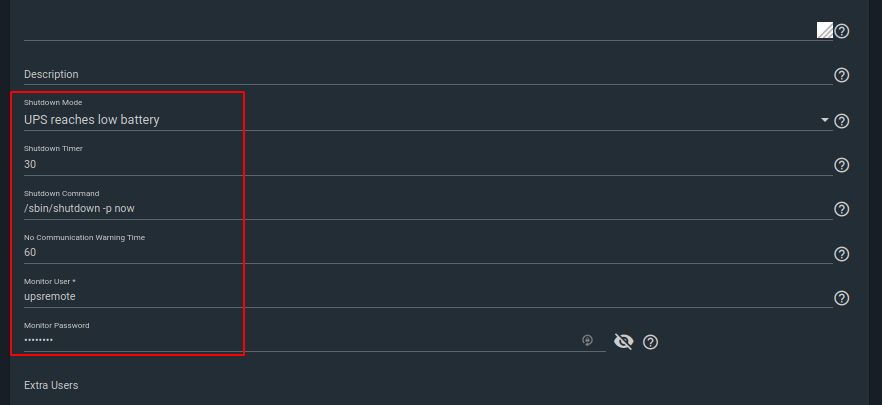
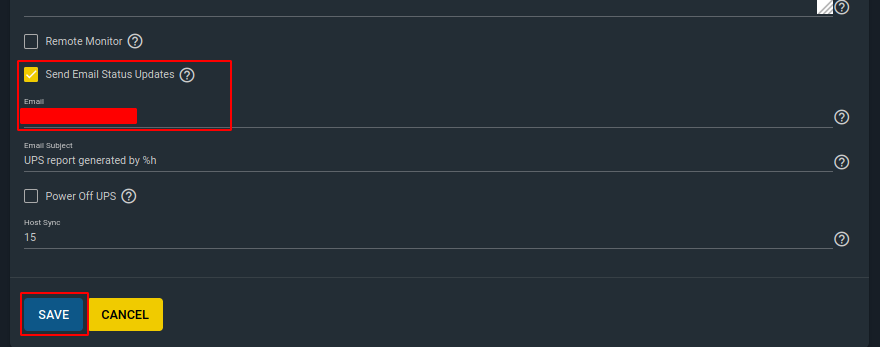
Check the ‘Send Email Status Updates’ if you’d like to received emails (also add your email address). Click on save.
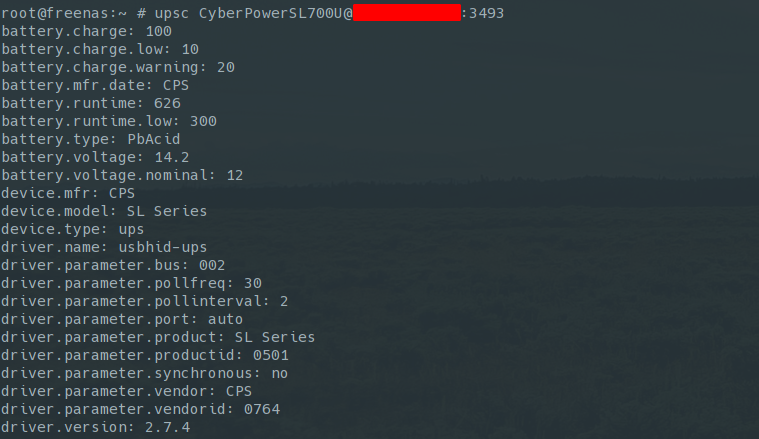
c. Check the connection to the UPS with the command below
upsc ups_name@ip:port
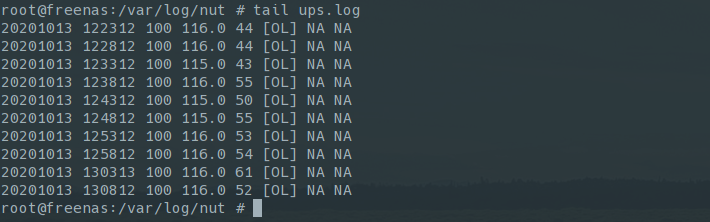
d. Check that FreeNAS is actually monitoring the UPS (/var/log/nut/ups.log)
OL - On line (no power failure)
OB - On battery
LB - Low battery
e. Log back to your master machine and confirm that you can see FreeNAS as a connected client (upsc -c)
Assuming that my FreeNAS IP is 192.168.10.20
$ upsc -c ups_name@localhost
192.168.10.20
Tip: You can also check the status of nut-server.service and it will show you the connected clients
Bonus: Setup CentOS as client/slave
As I mentioned before, I also have a CentOS server that connects to this UPS. So here’s how to configure it.
a. Install nut-client
# yum install -y nut-client
b. Add the monitor line to /etc/ups/upsmon.conf
MONITOR CyberPowerSL700U@10.13.15.200 1 [slave user] [slave pass] slave
c. Enable and start the service
# systemctl enable --now nut-monitor.service
d. Check that you can see the new client in the master (upsc -c [ups name])
# upsc -c CyberPowerSL700U
127.0.0.1
192.168.10.20  # FreeNAS
192.168.10.21  # CentOS
Testing
Now let’s test see if all works. Instead of pulling the cord we can instead run upsmon -c fsd on the master (this will save wear and tear on your battery). Hopefully we have configured our delay time properly and we should see all our devices powering off, and eventually the UPS as well.
Tip: Because I have quick removable drive bays on my FreeNAS server, I have removed all drives before testing (to be extra careful and to avoid any issues).
➤ sudo upsmon -c fsd